In interplay we provide nodes to build LLM model based applications. We created nodes that serve a specific purpose and can be combined to create different flows, such as text data formatting, text summarization, text intent analysis, simple chatbot creation, and a question-answering flow. These are the nodes created.
- 01-AI-LLM-Initiate-Project
- 23-AI-LLM-Load_Vector_Database
- 02-AI-LLM-Data-Downloader
- 04-AI-LLM-Data-Loader
- 10-AI-LLM-Manager
- 11-AI-LLM-QA-Node
- 12-AI-LLM-Templates
- 13-AI-LLM-Memory
- 14-AI-LLM-Data-Formatter
- 15-AI-LLM-IntentAnalyser
- 16-AI-LLM-Agent
- 17-AI-LLM-Agent-Response-Generator
- 18-AI-LLM-Data-Summarizer
- 19-AI-LLM-Tools
- 20-AI-LLM-SFT-Finetune
- 21-AI-LLM-SFT-Inference
- 22-AI-LLM-Build_Vector_Database
- 24-AI-LLM-CSV-Preprocessor
- 25-AI-LLM-Cache-Cleaning
Here are a few flows that can be implemented from the nodes above
- Simple chatbot
- QA flow (Question Answering)
- Data formatter
- Intent Analyzer
- Data summarizer
- LLM SQL Agent flow
- Tools
- SFT-Finetune
1)Simple chatbot
This chat bot involves three main steps.
1.Knowledge onboarding
During question answering in the chatbot, an LLM can be provided with a specific context as a knowledge base for more accurate and relevant answers. This information can come in different file formats like .pdf and .csv, which are managed by the respective nodes. The Chroma db Vector database is utilized to store the data, enabling more accurate semantic search for knowledge retrieval in less time.
Available Embedding Models:
all-mpnet-base-v2
multi-qa-MiniLM-L6-cos-v1
all-distilroberta-v1
instructor-xl
multi-qa-mpnet-base-dot-v1
To create a vector database, there are specific workflows for processing .pdf, .txt and .csv files. Additionally, for .csv files, an extra step known as the CSV preprocessing flow must be executed before initiating the standard workflows. Let's explore these procedures in two sections:
1.For PDF and TXT Files:
2.For CSV Files:
Before proceeding with the common workflows used for PDF and TXT files, CSV files require a preliminary step called the CSV preprocessing flow. This additional step ensures the CSV data is correctly formatted and ready for building a vector database.
1)For PDF and TXT Files:
Building the database involves two main steps:
1. Data downloading
2. Vector database creation
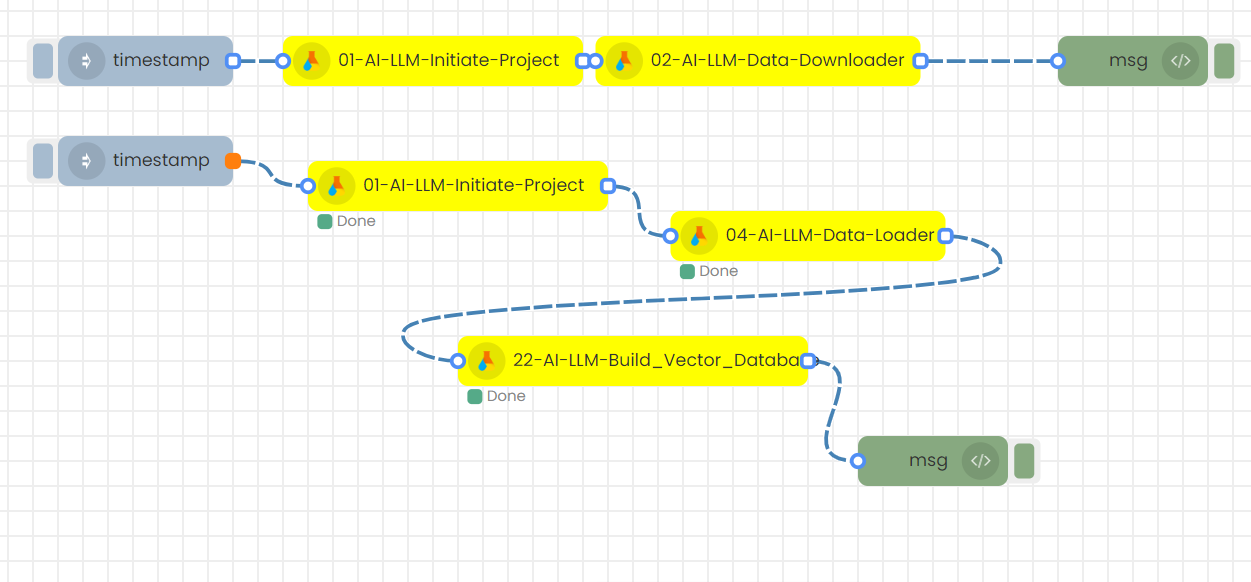
1. Data downloading
Step-01
In this flow you can upload files needed for knowledge into a folder. Initially, create the above flow using the LLM-Initiate-Project and LLM-Model-Downloader nodes.

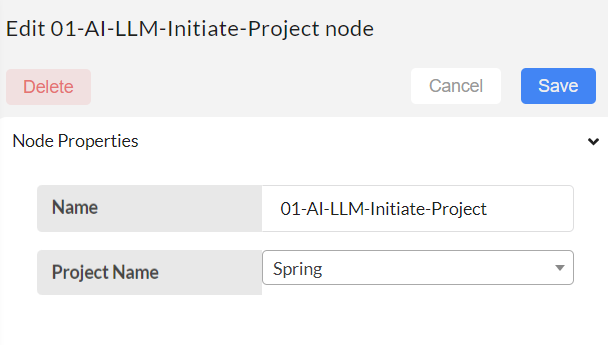
Step-02
Type and create a project name (Ex: spring) and save.
Step-03
Configure the LLM-Data-Downloader to download the data in the project for database.
Data-set name - create a new dataset or select existing data sets to add files (Ex: spring_dataset). Multiple files can be uploaded with in same dataset name.
Select platform - Select platform as Local storage (Upload from local computer).
Upload File- Upload a file from local storage and click on the upper arrow. Your file will be saved in a directory. Can upload multiple files under same dataset name with different file type extensions (.pdf, .txt)
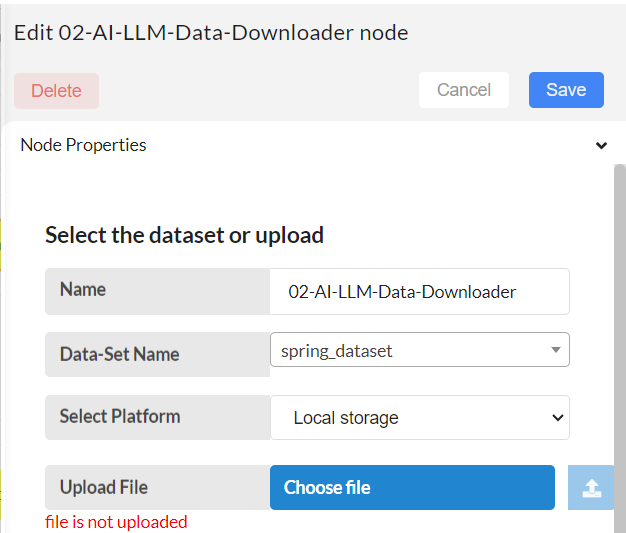
Then click Save.
Step-04
After finishing step-03, deploy and trigger this flow.
Then the added local files will be saved into the Interplay storage at this path: Data/Projects/LLM_manager_commonnodes/{Project Name}/{Dataset Name}/.
For example, if the Project Name is 'spring' and the Dataset Name is 'spring_dataset', the location of the uploaded files will be:
Data/Projects/LLM_manager_commonnodes/spring/spring_dataset/filename1.pdf
Data/Projects/LLM_manager_commonnodes/spring/spring_dataset/filename2.txt
2. Vector database creation
Step-01
Following flow need to be created to generate vector database from the knowledge base.
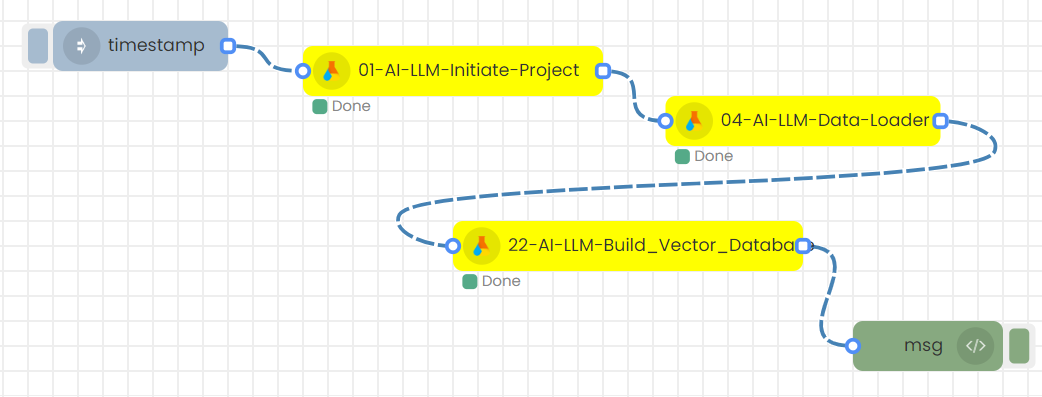
Step-02
Next step is to make sure the Project name in the LLM-Initiate-Project-1 node is selected correctly .Then, Save.

Step-03
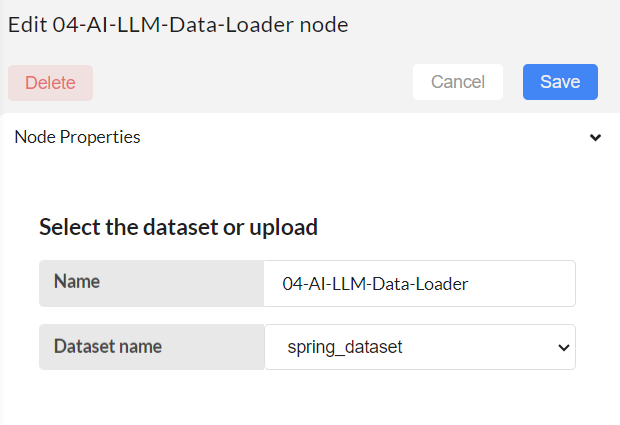
Next step is to configure the LLM-Data-downloader node. Select your preferred created dataset for the vector database creation.
Dataset name - Give the dataset name, that has data files in it. Vector database will be created for this given dataset. Then, Save.
Step-04
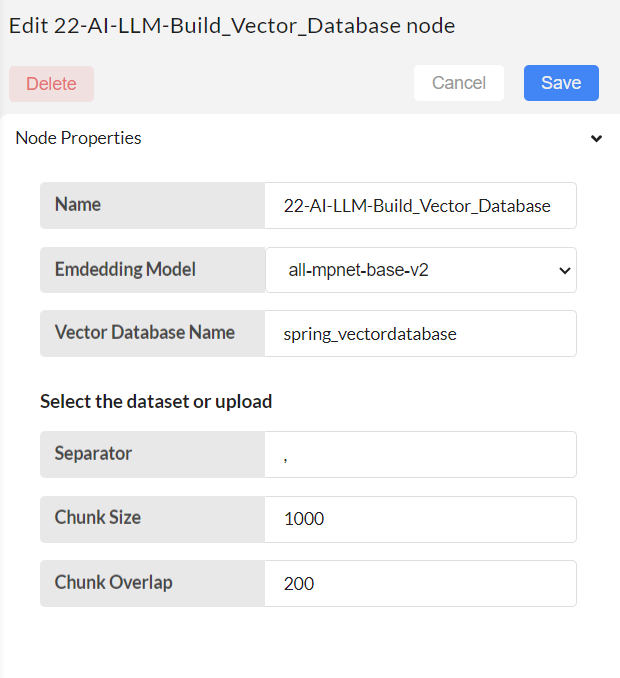
Configure the build vector database node.
Give a name to the Vector database to be created from the selected dataset.
Choose the embedding model.
Set configurations for text splitting, and ultimately build a vector database with the specified vector database name.
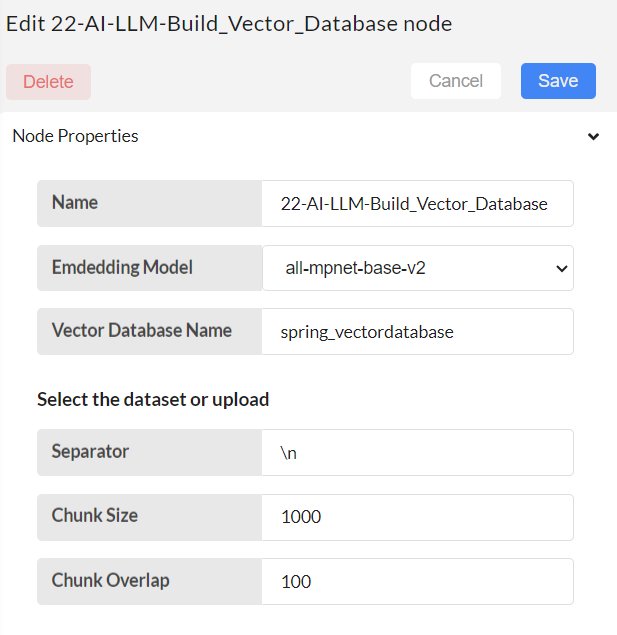
Embedding model: It will load the specific model for embedding. Choose the embedding models as your preference. Currently it has five models.
Vector Database name - specify the unique name for your vector database.
Other 3 inputs are used to split the content in multiple documents if it is too long.
Separator - specify the separator to split the content into chunks.
Chunk size - maximum limit of the chunks.
Chunk overlap - overlap chunks while doing the splitting for the continuity. It specify the overlap chunk size.
Then, Save.
Step-05
Deploy and trigger this flow.
The vector database will automatically create.
The created vector database will be saved into the Interplay storage at this path:
Data/Projects/LLM_manager_commonnodes/{Project Name}/database/{Embedding model}/{Database Name}/.
For example, if the Project Name is 'spring' and the Database Name is 'spring_vectordatabase', the location of the database will be: Data/Projects/LLM_manager_commonnodes/spring/database/all-mpnet-base-v2/spring_vectordatabase/.
2)For CSV Files:
Building the database involves three main steps:
- CSV file preprocessing
- Data downloading
- Vector database creation
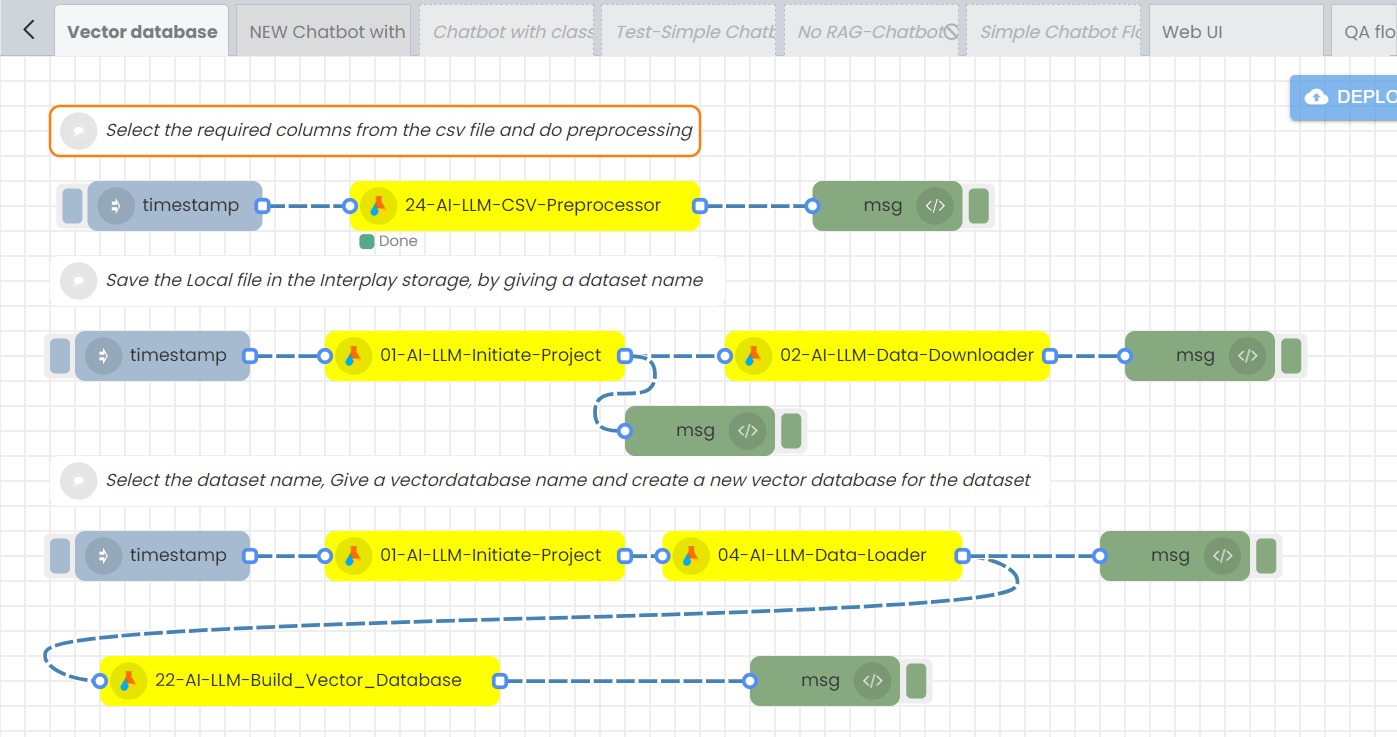
1. CSV file preprocessing
Step-01
Create this flow

Step-02
Configure the 24-AI-LLM-CSV-Preprocessor node.
The 24-AI-LLM-CSV-Preprocessor node allows certain preprocessing on csv files before using them to create vector databases. It involves, taking required columns from users and join the values in them to create a new column for all the rows, it will create a new preprocessed csv file. Users can provide a template for that, or else, auto template is created for the selected columns.
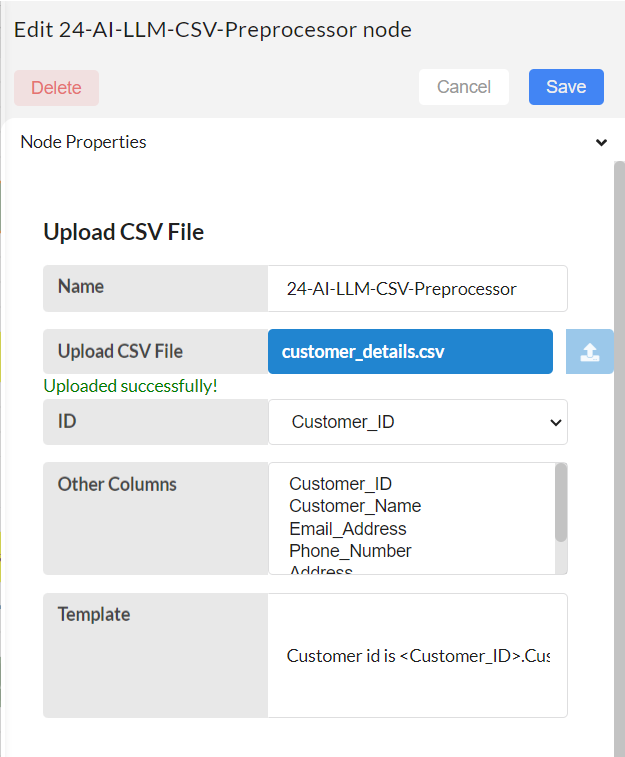
Upload CSV file: Upload a CSV file from your local storage.
ID: Choose the ID column from the dropdown menu. This column should be a unique identifier for each row.
Other Columns: From the dropdown menu, select the names of the columns you wish to retain in the preprocessed CSV file. The data from these selected columns will be converted to text and consolidated into a single column for all rows.
Template: The data from the selected columns will be converted to text and consolidated into a single column for all rows. During the text conversion process, a template is used to replace the actual data, creating formatted text.
For example, if the selected columns are customer_id, company_name, and age, a sample template provided by the user based on their preference might be: 'Customer id is <customer_id>. I am working at <company_name>. I am <age> years old.' Users can write a story by utilizing the selected column names and crafting a template. When integrating this preprocessed CSV with the built vector database, semantic search becomes easy, accurate, and the LLM model responds more effectively, as this step enhances the understanding of human language.
If this field is left empty, an automatic template will be generated and used.
Step-03
Save and deploy.
The original csv file will be saved in this directory: “/DATA/PROJECTS/csvdata/original_dataset/”
The preprocessed csv file will be saved in this directory: "/DATA/PROJECTS/csvdata/preprocessed_dataset/
"
2. Data downloading
Step-01
In this flow you can upload files needed for knowledge into a folder. Initially, create the above flow using the LLM-Initiate-Project and LLM-Model-Downloader nodes.
Step-02
Type and create a project name (Ex: spring) and save.
Step-03
Configure the LLM-Data-Downloader to download the data in the project for database.
Data-set name - create a new dataset or select existing data sets to add files (Ex: spring_dataset). Multiple files can be uploaded with in same dataset name.
Select platform - Here, we have two options in the dropdown: "Local Storage" and "Interplay." If you wish to upload files from local storage, select this option. If you prefer to use a preprocessed CSV file stored in Interplay, then choose the Interplay option.
Upload File- If the "Select Platform" option is chosen as "Local Storage," you will be given the option to upload files. Upload a file from local storage and click on the upper arrow.
Select File- If the "Select Platform" option is selected as "Interplay," you will have the option to choose the preprocessed file you prefer. A dropdown will display all the available preprocessed CSV files in the directory "/DATA/PROJECTS/csvdata/preprocessed_dataset/". Select the CSV file from there.
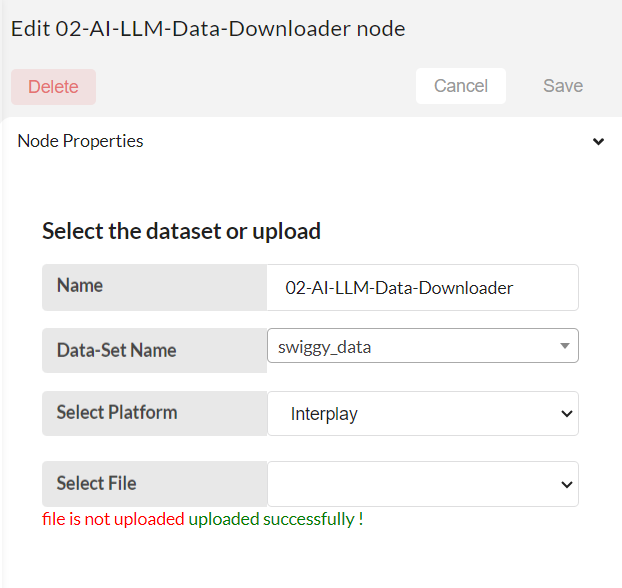
Then click Save.
Step-04
After finishing step-03, deploy and trigger this flow.
Then the added files will be saved into the Interplay storage at this path: Data/Projects/LLM_manager_commonnodes/{Project Name}/{Dataset Name}/.
For example, if the Project Name is 'spring' and the Dataset Name is 'spring_dataset', the location of the uploaded files will be:
Data/Projects/LLM_manager_commonnodes/spring/spring_dataset/filename1.csv
3. Vector database creation
The creation of a vector database follows a procedure fully similar to that for .pdf or .txt files, as explained above.
Step-01
Following flow need to be created to generate vector database from the knowledge base.
Step-02
Next step is to make sure the Project name in the LLM-Initiate-Project-1 node is selected correctly .Then, Save.
Step-03
Next step is to configure the LLM-Data-downloader node. Select your preferred created dataset for the vector database creation.
Dataset name - Give the dataset name, that has data files in it. Vector database will be created for this given dataset. Then, Save.
Step-04
Configure the build vector database node.
Give a name to the Vector database to be created from the selected dataset.
Choose the embedding model.
Set configurations for text splitting, and ultimately build a vector database with the specified vector database name.
Embedding model: It will load the specific model for embedding. Choose the embedding models as your preference. Currently it has five models.
Vector Database name - specify the unique name for your vector database.
Other 3 inputs are used to split the content in multiple documents if it is too long.
Separator - specify the separator to split the content into chunks. For .csv files, provide comma as the seperator.
Chunk size - maximum limit of the chunks.
Chunk overlap - overlap chunks while doing the splitting for the continuity. It specify the overlap chunk size.
Then, Save.
Step-05
Deploy and trigger this flow.
The vector database will automatically create.
The created vector database will be saved into the Interplay storage at this path:
Data/Projects/LLM_manager_commonnodes/{Project Name}/database/{Embedding model}/{Database Name}/.
For example, if the Project Name is 'spring' and the Database Name is 'spring_vectordatabase', the location of the database will be: Data/Projects/LLM_manager_commonnodes/spring/database/all-mpnet-base-v2/spring_vectordatabase/.
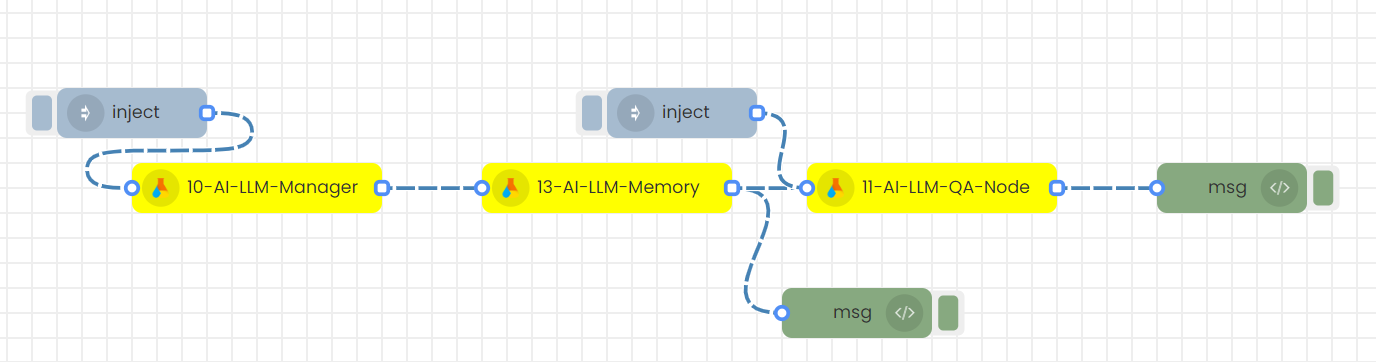
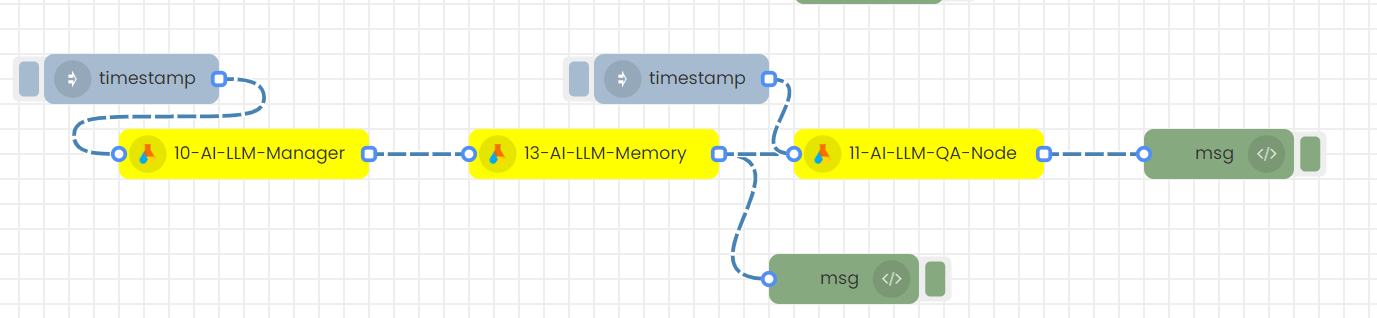
2.Inference flow of the chat
Step-01
Following flow needs to be created to do the inference.
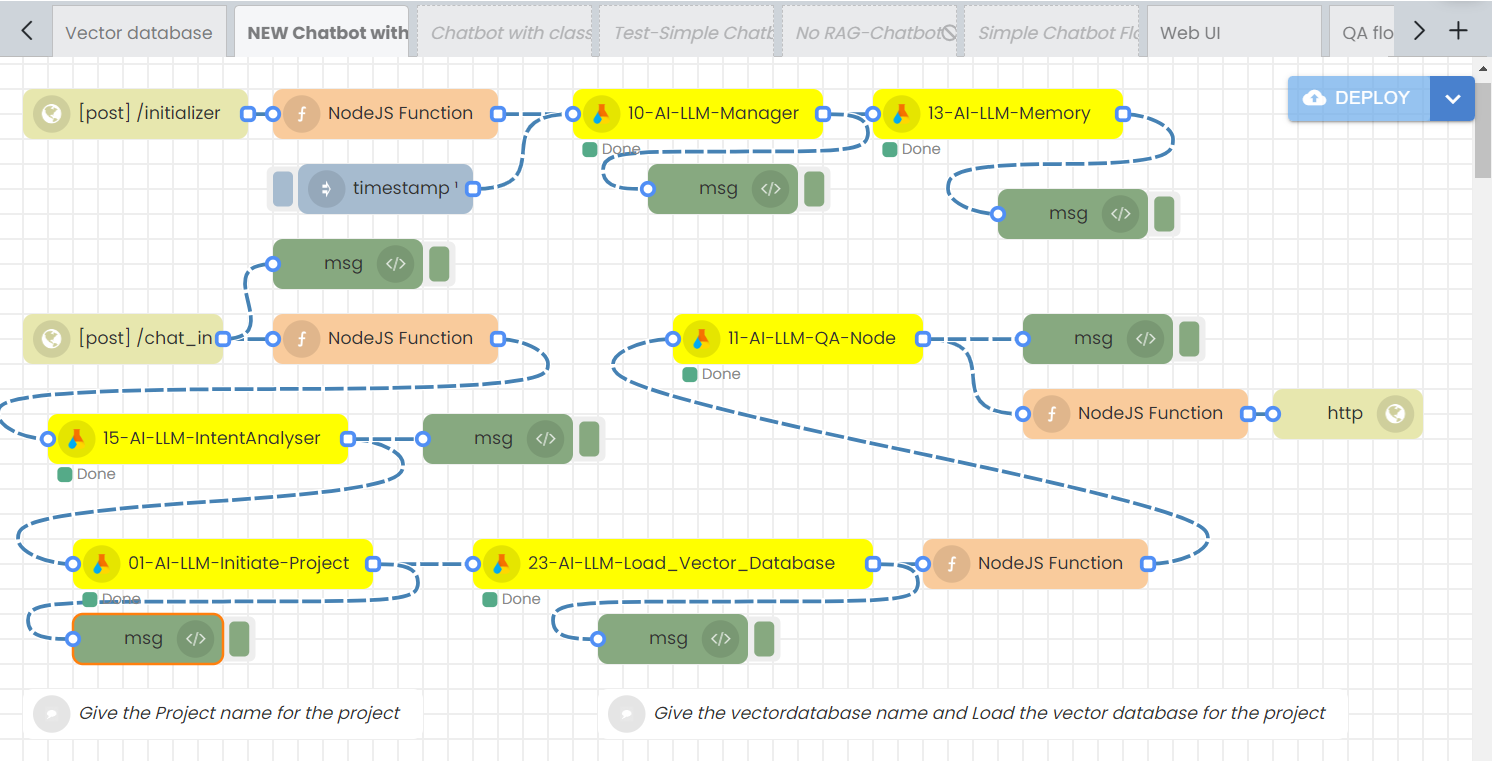
Step-02
Configure the 10-AI-LLM-Manager node.
Model Type: This node selects the LLM model from 3 different categories. They are OpenAI, Bison and Hugging face. These are mentioned as “Model_type” in the nodes.
Model Name: The following models: GPT-4, GPT-3.5-turbo, Turbo, and GPT-3.5-turbo-1106 are available under the model type 'OpenAI.' The model text-bison-32k is available under the model type 'Bison,' and the model meta-llama/Llama-2-7b-chat-hf is available under the 'Hugging Face' model type.
Max tokens: Controls the maximum number of tokens that the model will generate in response.
top_k: Number of token the model will consider for its next choice. It introduces some randomness and can enhance the quality of the generated text.
top_p: Unlike top_k, considers a dynamic number of tokens based on their cumulative probability.
Temperature:
If Model Type selected is OpenAI,
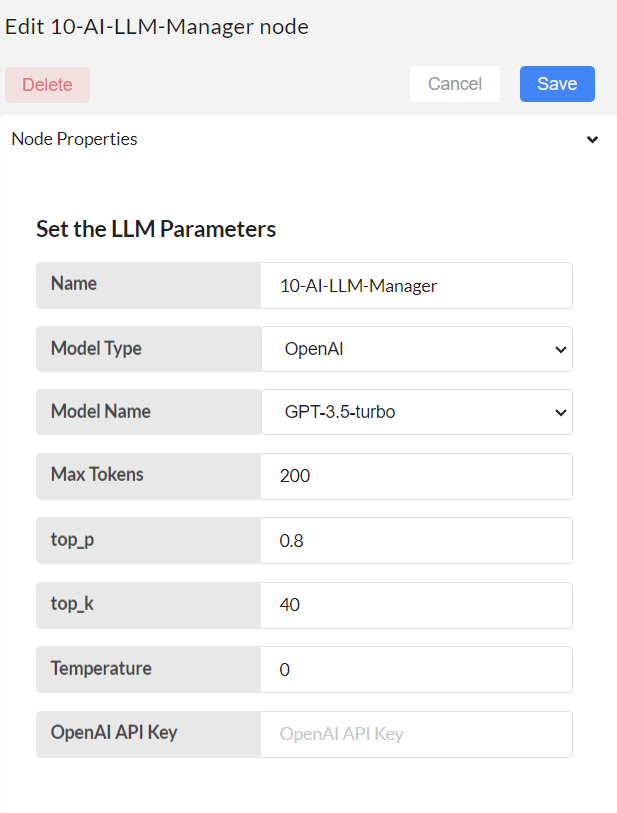
OpenAI API Key: API KEY has to be given.
If Model Type selected is Bison,

Sevice account file: Upload your google cloud's service account file here and click up arrow.
If Model Type selected is Hugging face,
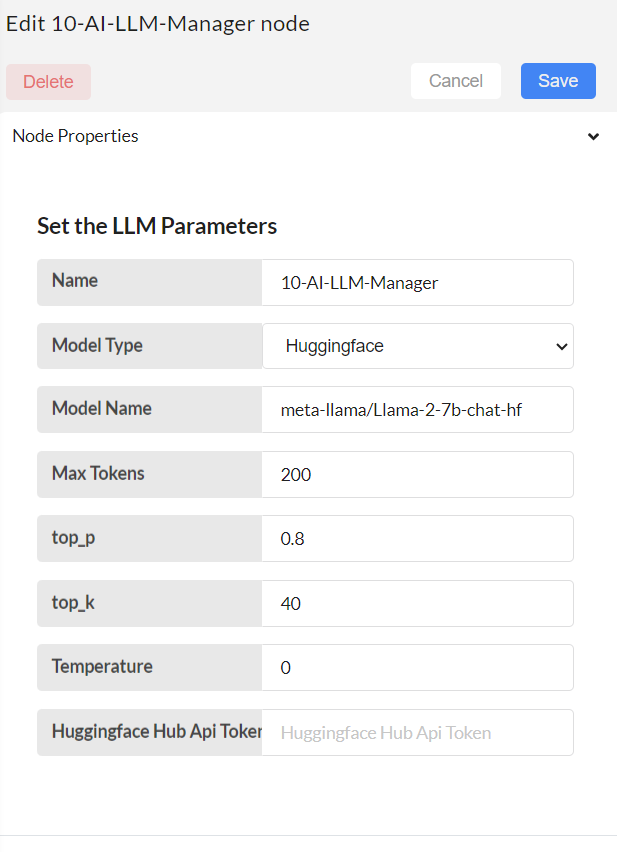
Model Name: Type the preferred model name that belongs to LLma2 (Ex: meta-llama/Llama-2-7b-chat-hf)
Huggingface Hub API Token: Provide the hugging face API token
Then, Save.
Step-03
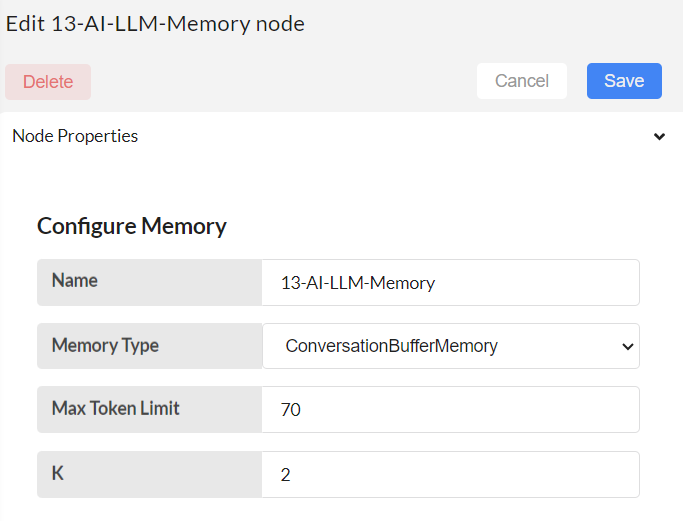
Configure the 13-AI-LLM-Memory node.
This node is used to create chat history during the conversation.
Memory type: Select within different types of buffer memories, including ConversationBufferMemory, ConversationBufferWindowMemory, and ConversationTokenBufferMemory.
Max token limit: It is aligned with ConversationTokenBufferMemory memory type. For this memory type, max_token_limit is needed and can be changed based on requirement. It defines the maximum capacity of this buffer memory. If the max_token_limit is set to 70, it means the buffer memory can hold up to 70 tokens at any given time.
K : It is aligned with ConversationBufferWindowMemory, memory type.It represents the number of conversational turns or exchanges that the buffer memory keeps track of. For instance, if k size is set to 2, the system may store the last two exchanges between the user and the AI.
This node should always be connected with the llm_manager node.
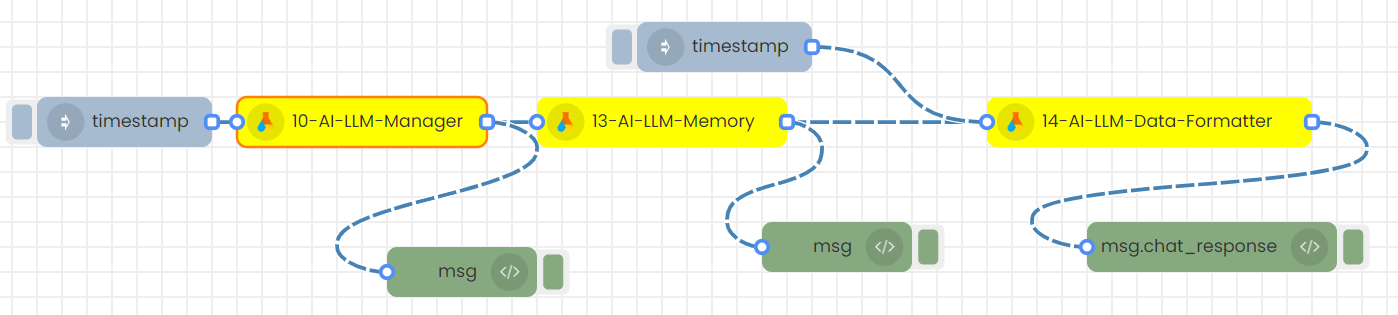
Step-04
Do the above mentioned configurations, save and deploy. The timestamp in the below diagram will be autotriggered.
This will create the LLM model and initiate the memory.
Step-05
Once those 2 nodes are triggered, we should load the vector database created to provide the knowledge for the chatbot. For that configure these 2 nodes: 01-AI-LLM-Initiate Project node and 23-AI-LLM_Load vector database node.
01-AI-LLM-Initiate Project node:
Make sure the project name is selected correctly. Then, Save.

23-AI-LLM_Load vector database node:
This node helps loading the created vector database.
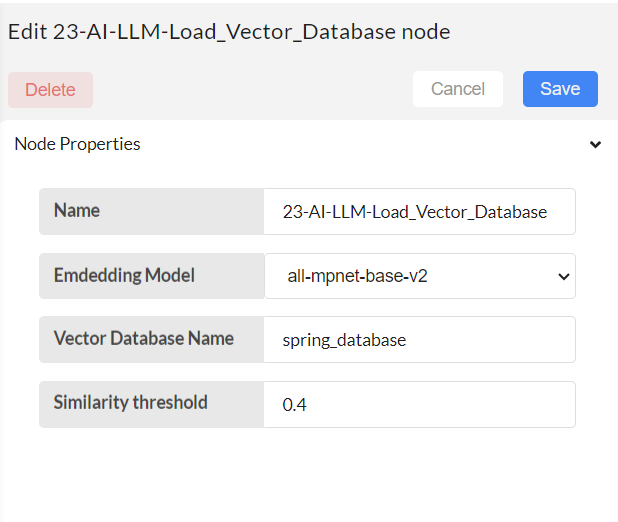
Embedding Model: Choose the embedding model that was previously selected from the given five options.
Vector Database Name: Provide the name of the vector database as you prefer. (That was previously specified when building the vector database)
The following inputs are related to semantic search.
Similarity threshold - set a similarity for semantic search in between zero to one.
Then, Save and Deploy.
Step-06
Start chatting by asking questions.
Step-07
Note:
If you want to try a different LLM model, for example, switching from GPT-4 to text-bison-32k, go to the 10-AI-LLM-Manager node , change the model type and model name, make the respective changes in the 10-AI-LLM-Manager node, save it, deploy, and then continue chatting.
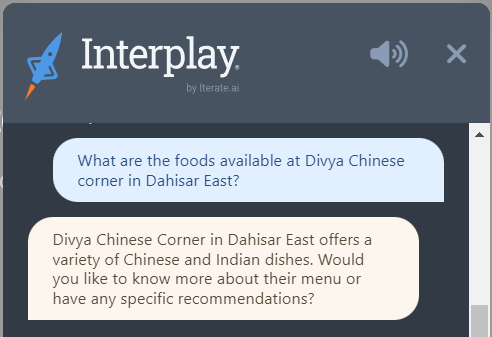
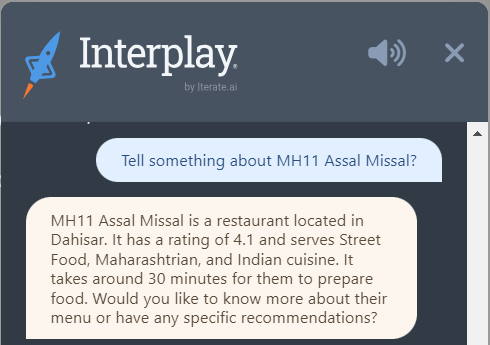
2)QA flow (Question Answering)
This node generates relevant follow-up questions or answers based on the provided user question. It requires an LLM model to function, therefore the LLM_manager node must be connected beforehand. Alternatively, any other LLM generation node can be connected.
There are two ways to provide input values to the nodes:
1. Through the node's UI with a timestamp to trigger
2. In JSON format (msg object) with an inject node to trigger
Among these two methods, inputs in JSON format through the inject node take higher priority than inputs from the node's UI. To be clear, if you have set inputs through the inject node, but then change the inputs in the node's UI, these changes will not be updated.
1. Sending inputs through the node's UI with a timestamp to trigger
Step-01
Configure 10-AI-LLM-Manager node.
Select the Language Model (LLM): Choose between GPT-4, GPT-3.5-turbo, Turbo, GPT-3.5-turbo-1106, meta-llama/Llama-2-7b-chat-hf, or text-bison-32k through the LLM Manager node.
Then, save
Step-02
Configure 13-AI-LLM-Memory node.
Choose the Memory Type and set the desired memory type in the Memory node.
Then, save
Step-03
Configure 11-AI-LLM-QA node.
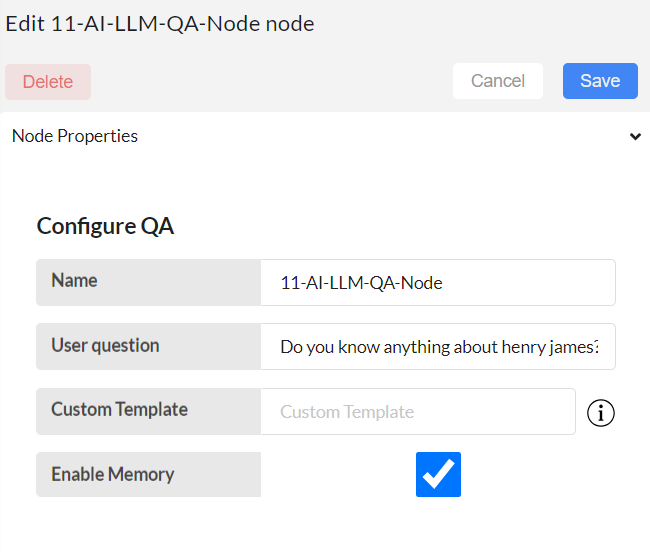
User question: Enter your questions here.
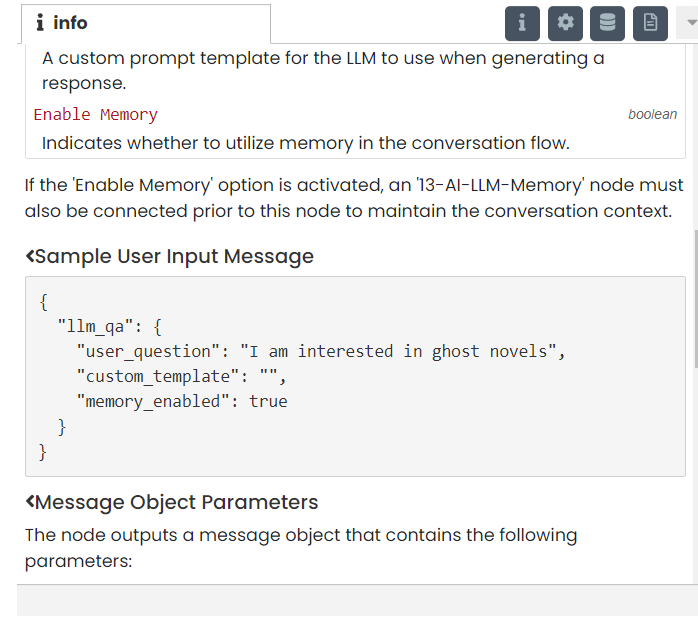
Custom template: If you want to continue with the default template, leave it blank. If you want to change the template, hover over the icon on the right to get the format of the required template.
Enable Memory: Tick or Untick whether a chatbot has to follow the chat conversation or not.
Then, save
Step-04
Click on deploy and trigger the flow by triggering the timestamp
Step-05
If you want to continue the conversation with the LLM by asking subsequent questions, change the user question in the LLM QA node, save it, deploy the flow, and then trigger the second timestamp to get the next response.
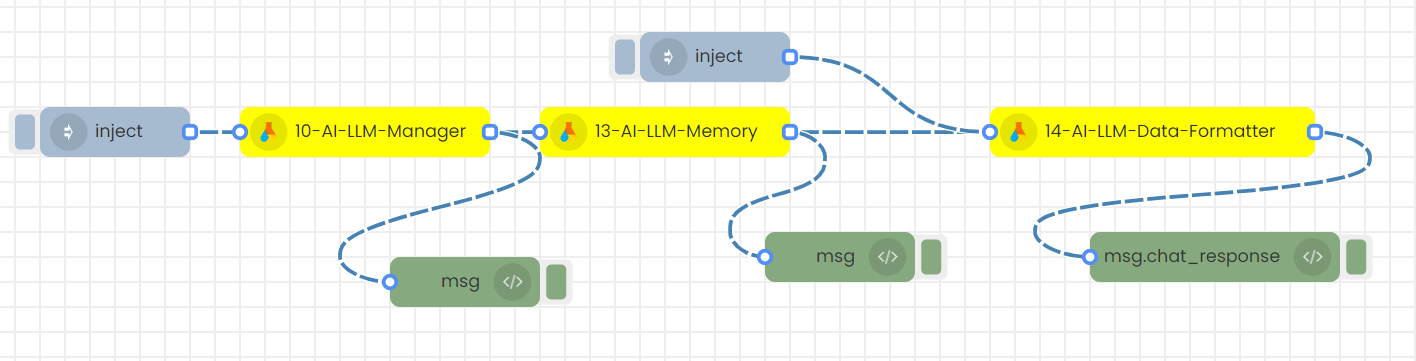
2.Sending inputs in JSON format (msg object) with an inject node to trigger
Step-01
Create this flow with inject nodes.
Step-02
Double click on the inject node.
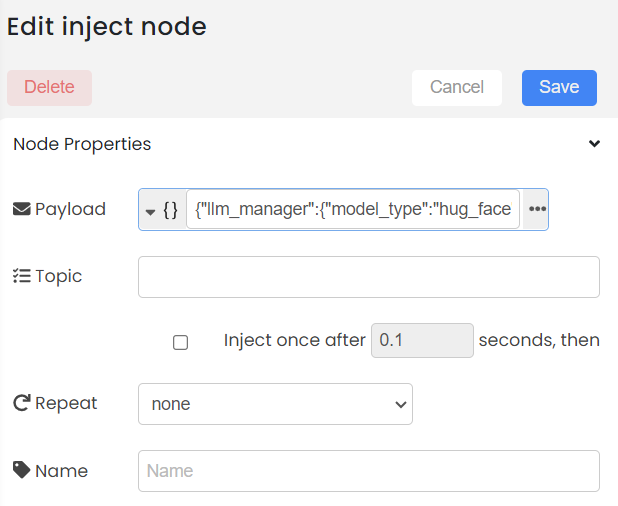
Step-03
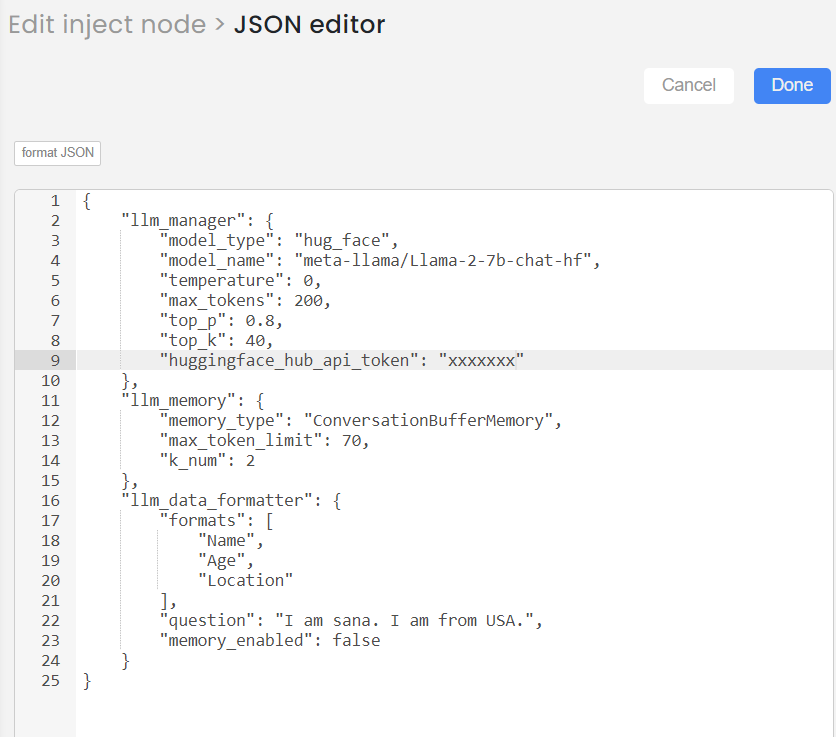
Add the inputs in Json format as below and Save
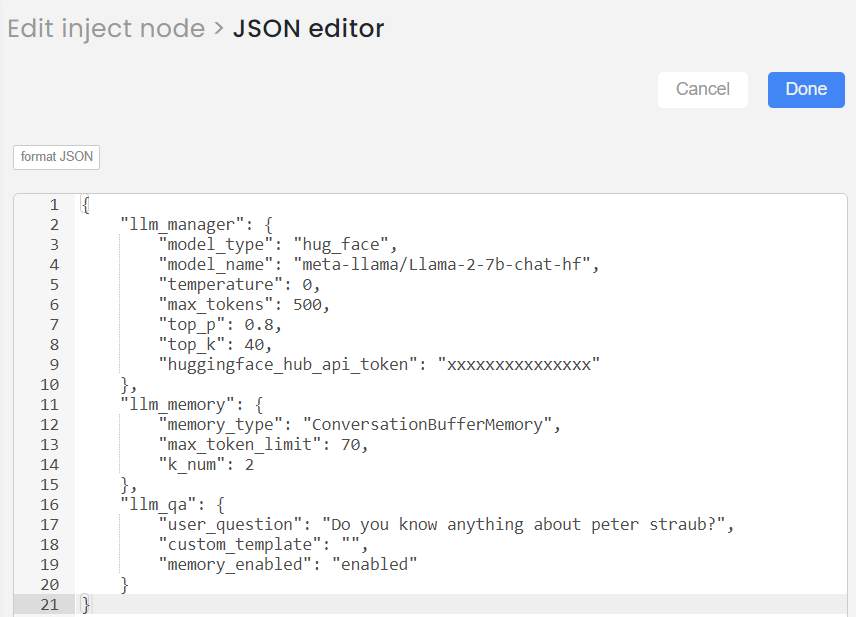
If you want to use bison model, you can provide the input in the following format:
{
"llm_manager":{
"model_type":"bison",
"model_name":"text-bison-32k",
"temperature":0,
"max_tokens":200,
"top_p":0.8,
"top_k":40,
"service_account_file":"/interplay_v2/public/private/DATA/PROJECTS/llm_manager/xxxxx.json"
},
"llm_memory":{
"memory_type":"ConversationBufferMemory",
"max_token_limit":70,
"k_num":2
},
"llm_qa":{
"user_question":"I am interested about ghost novels",
"custom_template":"",
"memory_enabled":"enabled"
}
}
If you want to use gpt models, you can provide the input in the following format:
{
"llm_manager":{
"model_type":"openai",
"model_name":"gpt-4",
"temperature":0,
"max_tokens":200,
"top_p":0.8,
"top_k":40,
"openai_api_key":"xxxxxxxxxxxxxx"
},
"llm_memory":{
"memory_type":"ConversationBufferMemory",
"max_token_limit":70,
"k_num":2
},
"llm_qa":{
"user_question":"I am interested about ghost novels",
"custom_template":"",
"memory_enabled":"enabled"
}
}
If you want to use LLama2 model, you can provide the input in the following format:
{
"llm_manager":{
"model_type":"hug_face",
"model_name":"meta-llama/Llama-2-7b-chat-hf",
"temperature":0,
"max_tokens":200,
"top_p":0.8,
"top_k":40,
"huggingface_hub_api_token":"xxxxxxxxxxxxxxxxxxxx"
},
"llm_memory":{
"memory_type":"ConversationBufferMemory",
"max_token_limit":70,
"k_num":2
},
"llm_qa":{
"user_question":"I am interested about ghost novels",
"custom_template":"",
"memory_enabled":""
}
}
Step-04
Deploy and then trigger the 1st inject node. You will get the response.
Step-05
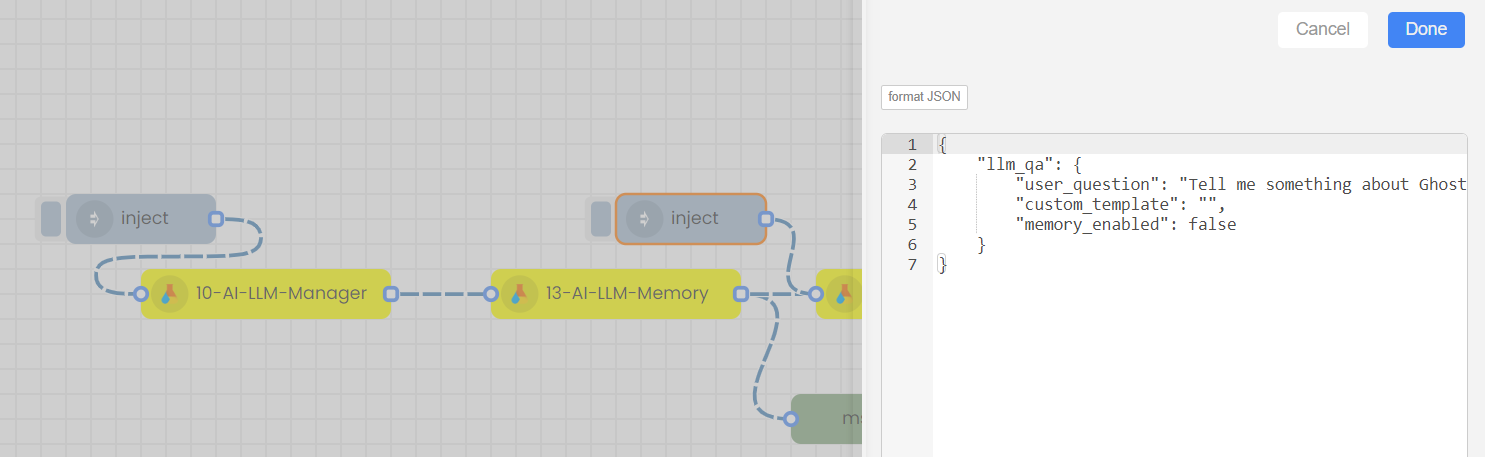
If you want to continue the conversation with the LLM by asking subsequent questions, double click on the 2nd Inject node, change the user question, save, deploy the flow and finally trigger the 2nd inject node.
You will get the next response. Likewise you can continue the conversation.
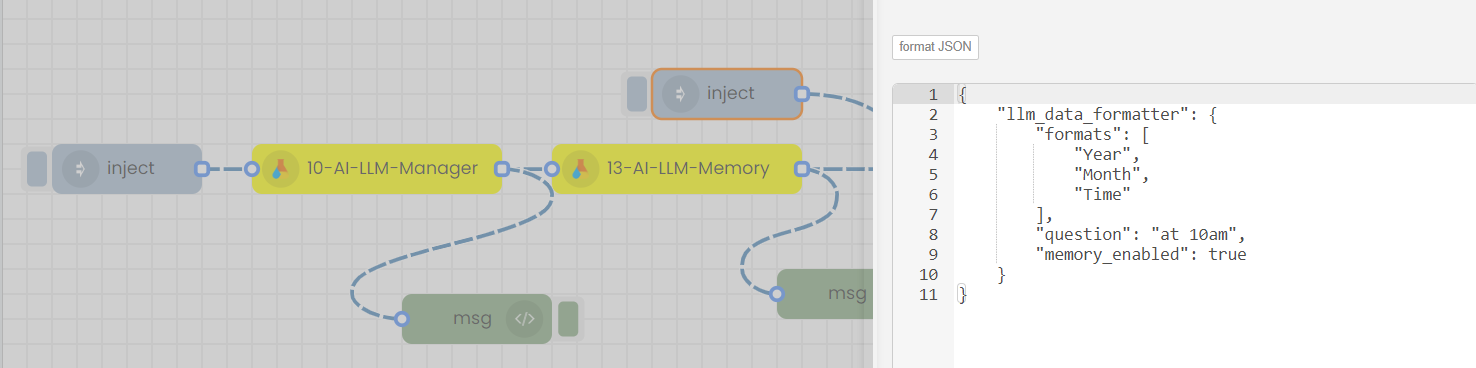
3)Data formatter
If you want to format any text data in a specific format, they can use this data formatter node.
1. Sending inputs through the node's UI with a timestamp to trigger
Step-01
Configure 10-AI-LLM-Manager node.
Select the Language Model (LLM): Choose between GPT-4, GPT-3.5-turbo, Turbo, GPT-3.5-turbo-1106, meta-llama/Llama-2-7b-chat-hf, or text-bison-32k through the LLM Manager node.
Then, save
Step-02
Configure 13-AI-LLM-Memory node.
Choose the Memory Type and set the desired memory type in the Memory node.
Then, save
Step-03
Configure 14-AI-LLM-Data formatter node.
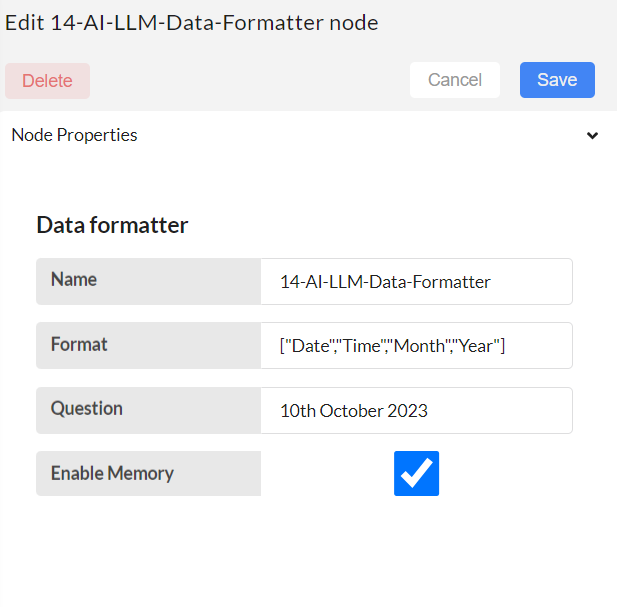
Format: Add list of formats required. Required formats must be given as a list.
Question: Add any text
Example: If the required format is ID, Name, Address, then formats must be given as follows:
"formats":[ "ID","Name","Address"]
"question":"John Doe, residing at 123 Maple Street, has been assigned the ID number 4567."
Enable Memory: Tick or Untick whether a chatbot has to follow the chat conversation or not.
Then, save
Step-04
Click on deploy and trigger the flow by triggering the timestamp
Step-05
If you want to continue the conversation with the LLM by asking subsequent questions or want to change the format, do the changes in the LLM Data formatter node, save it, deploy the flow, and then trigger the second timestamp to get the next response.
2.Sending inputs in JSON format (msg object) with an inject node to trigger
Step-01
Create this flow with inject nodes.
Step-02
Double click on the inject node.
Step-03
Add the inputs in Json format as below and Save
This is how you can provide the input of Data formatter node:
"llm_data_formatter":{
"formats":[
"Date",
"Time",
"Month",
"Year"
],
"question":"10th October 2023 ",
"memory_enabled":true
}
Step-04
Deploy and then trigger the 1st inject node. You will get the response.
Step-05
If you want to continue the conversation with the LLM by asking subsequent questions, or want to change the format, double click on the 2nd Inject node, change the question or format, save, deploy the flow and finally trigger the 2nd inject node.
You will get the next response. Likewise you can continue the conversation without loading the LLM and memory each time.
4)Intent Analyzer
If you want to analyze the intent of a piece of text or paragraph, an Intent Analyzer node can be used.

1. Sending inputs through the node's UI with a timestamp to trigger

Step-01
Configure 10-AI-LLM-Manager node.
Select the Language Model (LLM): Choose between GPT-4, GPT-3.5-turbo, Turbo, GPT-3.5-turbo-1106, meta-llama/Llama-2-7b-chat-hf, or text-bison-32k through the LLM Manager node.
Then, save
Step-02
Configure 15-AI-LLM-IntentAnalyser node.
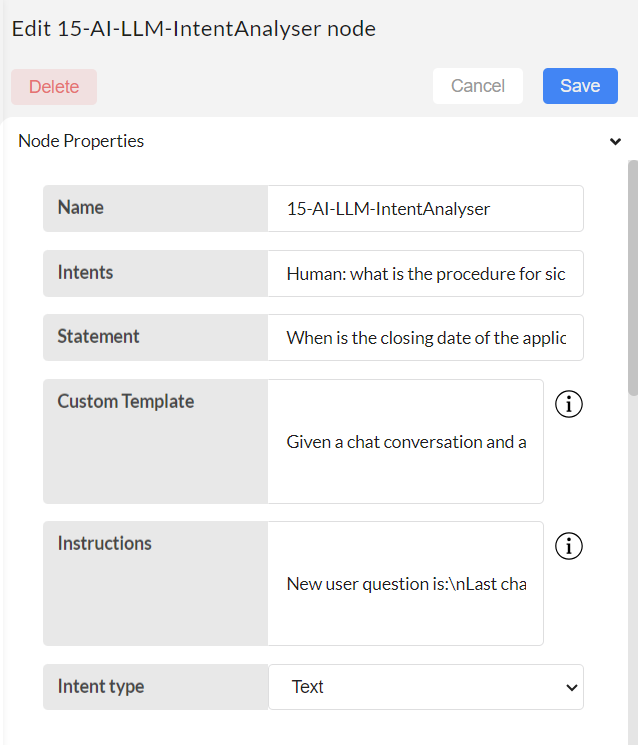
Intents can be in 2 formats: JSON or text. This is given by Intent type option.
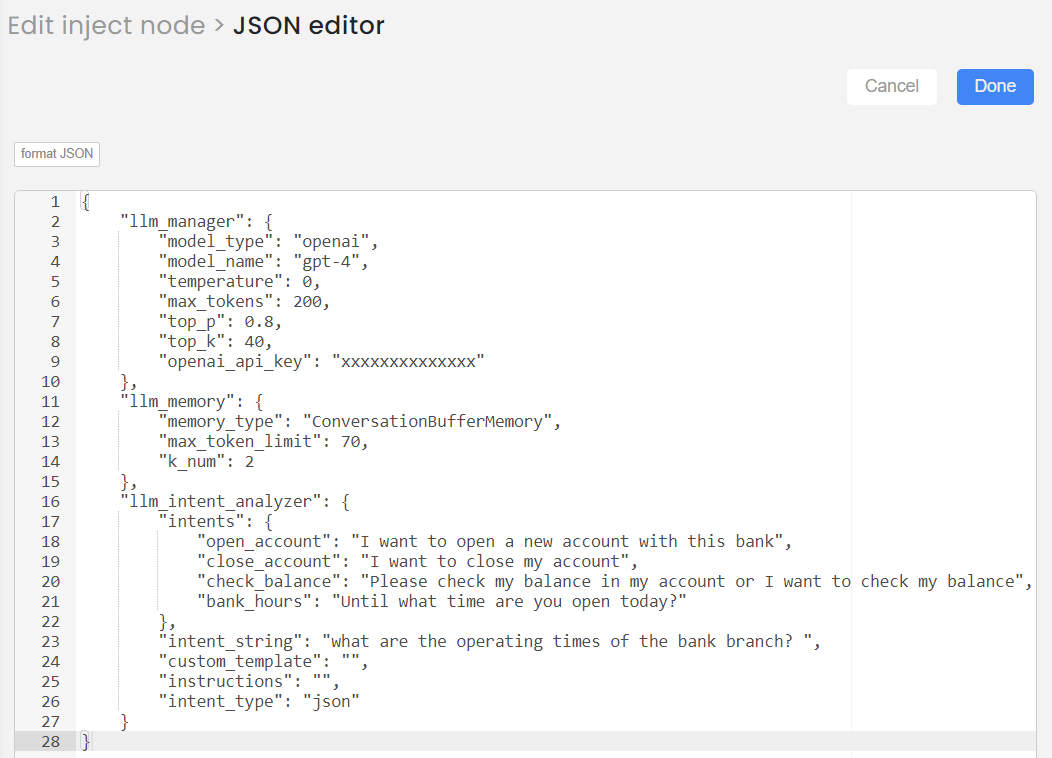
1.If Intent type is JSON:
Intents: Statement should be a dictionary.
E.g. { "open_account":"I want to open a new account with this bank", "close_account":"I want to close my account", "check_balance":"Please check my balance in my account or I want to check my balance", "bank_hours":"Until what time are you open today?" }
Statement: Any user text for which the intent must be analyzed.
E.g. What are the operating times of the bank branch?
Custom template: In this section, you can provide a custom template tailored to your specific scenario.
E.g. “Learn from the following Intent and the respecitive example action. Categorize the given question to which intent it belongs. Return the answer as Intent: [Answer] if you don't the know answer please return Unknown.”
This is the default template given in the node. You can change it if you prefer based on different scenarios through this input field.
Instructions: The instructions in this section assign appropriate headings to the input variables based on a custom template.
E.g. For example, if this node is utilizing predefined JSON-type intents to identify the intent of a provided statement, the instructions might be: “Question:\nIntent description:”. If left blank, the default instructions will be used.
Intent Type: “JSON” must be selected out of 2 options.
Then, save
2.If Intent type is Text:
Intents: Statement should be plain user text that requires intent analysis.
E.g. “Human: what is the procedure for sick leave in iterate AI: The procedure for sick leave at Iterate, as stated in the Employee Handbook, requires all California and Colorado employees to notify their supervisor and Human Resources via email when using time off for sick leave. This is to comply with State laws regarding sick leave tracking. It's also important to communicate with your manager and team members in advance when scheduling an absence and notify the appropriate manager before the start of the workday when an unscheduled absence occurs. Management may request verification of absences, such as a doctor's note, when it's legal and appropriate to do so. Do you need information on any other policies? Statement: What is the maternity leave policy in iterate”
Statement: Any user text for which the intent must be analyzed.
E.g. What are the operating times of the bank branch?
Custom template: In this section, you can provide a custom template tailored to your specific scenario.
E.g. """Given a chat conversation and a new user question, determine if the new user question is a continuation of the given chat conversation. Return 'True' if the new user question is a continuation, indicating it directly relates to or follows up on the conversation's topic. Return 'False' if the new user question introduces a new topic not directly related to the chat conversation.
Examples:
1. Chat Conversation: 'Human: How do I reset my password? AI: You can reset your password by going to the settings page, selecting 'Account Management', and then 'Reset Password'. Make sure to have your current password or access to your email to complete the process. Do you need help with anything else?'
New User Question: 'Can you guide me through the process?'
Answer: True
2. Chat Conversation: 'Human: what is the procedure for sick leave in Iterate? AI: The procedure for sick leave at Iterate, as stated in the Employee Handbook, requires all California and Colorado employees to notify their supervisor and Human Resources via email when using time off for sick leave. This is to comply with State laws regarding sick leave tracking. It's also important to communicate with your manager and team members in advance when scheduling an absence and notify the appropriate manager before the start of the workday when an unscheduled absence occurs. Management may request verification of absences, such as a doctor's note, when it's legal and appropriate to do so. Do you need information on any other policies?'
New User Question: 'What is the remuneration policy in Iterate?'
Answer: False
Determine if the new user question is a continuation of the chat conversation and return the answer 'True' or 'False' in this format Intent: [Answer]
"""
This is the default template given in the node. You can change it if you prefer based on different scenarios through this input field.
Instructions: The instructions in this section assign appropriate headings to the input variables based on a custom template.
E.g. For example, if this node is used within a chatbot to determine whether the chat history and a new user's question are related, the instructions could be: “New user question:\nLast chat conversation: ”.
Intent Type: “Text” must be selected out of 2 options.
Then, save
Step-04
Click on deploy and trigger the flow by triggering the timestamp
Step-05
If you want to continue the analysis, do the changes in the Intent analyser node, save it, deploy the flow, and then trigger the second timestamp to get the next response.
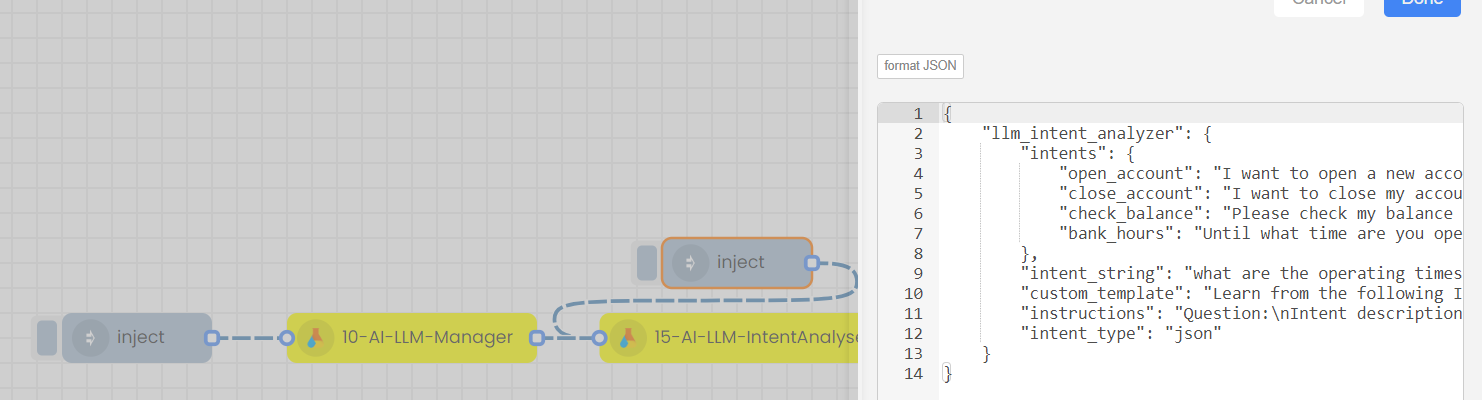
2.Sending inputs in JSON format (msg object) with an inject node to trigger
- Step-01
Create this flow with inject nodes.
- Step-02
Double click on the inject node.
- Step-03
Intents can be in 2 formats: JSON or text. This is given by Intent type option. Based on the input type, let's see how this step proceeds.
- If Intent type is Text:
- If Intent type is JSON:
Here for each input types you can go through two approaches,
- With Default template and Instructions ( Leaving Custom template and Instructions empty)
- With Custom template and Instructions.
- Type 1, Approach 1: Text input with Default template and Instructions
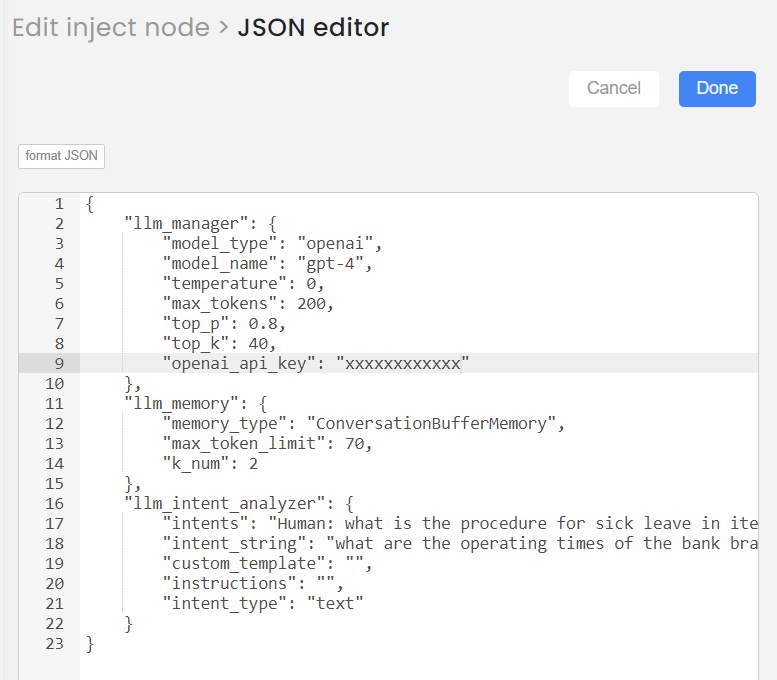
This is how you can provide the input of Intent analyser node (example):
"llm_intent_analyzer": {
"intents": "Human: what is the procedure for sick leave in iterate AI: The procedure for sick leave at Iterate, as stated in the Employee Handbook, requires all California and Colorado employees to notify their supervisor and Human Resources via email when using time off for sick leave. This is to comply with State laws regarding sick leave tracking. It's also important to communicate with your manager and team members in advance when scheduling an absence and notify the appropriate manager before the start of the workday when an unscheduled absence occurs. Management may request verification of absences, such as a doctor's note, when it's legal and appropriate to do so. Do you need information on any other policies? Statement: What is the maternity leave policy in iterate",
"intent_string": "what are the operating times of the bank branch? ",
"custom_template": "",
"instructions": "",
"intent_type": "text"
}
- Type 1, Approach 2: Text input with custom template and instructions.
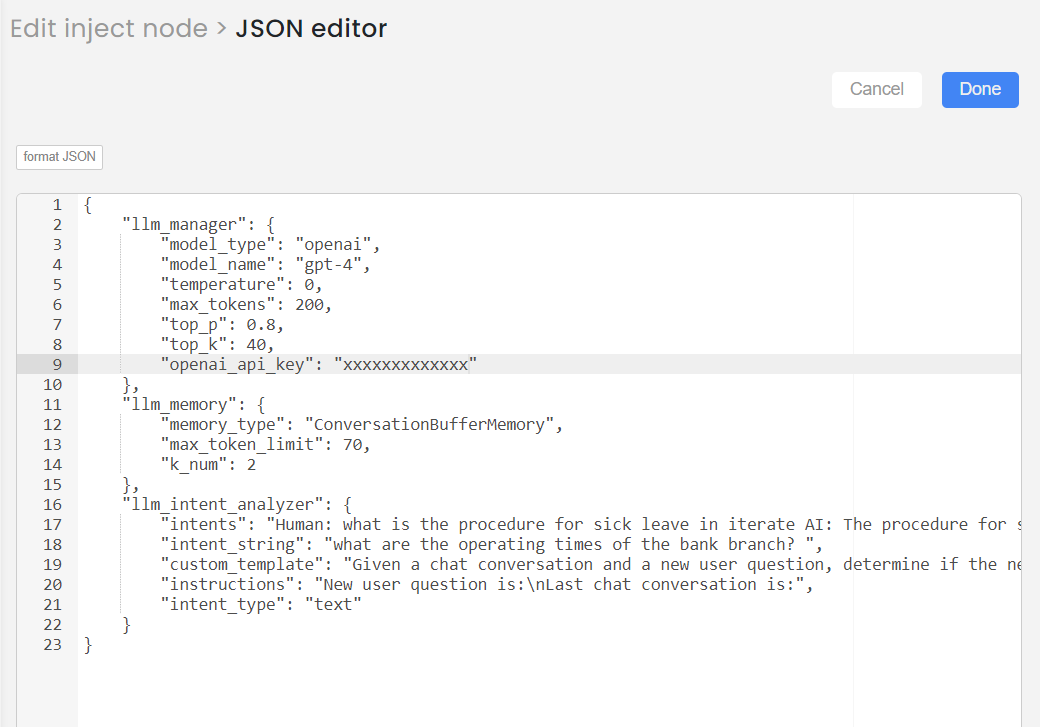
This is how you can provide the input of Intent analyser node (example):
"llm_intent_analyzer": {
"intents": "Human: what is the procedure for sick leave in iterate AI: The procedure for sick leave at Iterate, as stated in the Employee Handbook, requires all California and Colorado employees to notify their supervisor and Human Resources via email when using time off for sick leave. This is to comply with State laws regarding sick leave tracking. It's also important to communicate with your manager and team members in advance when scheduling an absence and notify the appropriate manager before the start of the workday when an unscheduled absence occurs. Management may request verification of absences, such as a doctor's note, when it's legal and appropriate to do so. Do you need information on any other policies? Statement: What is the maternity leave policy in iterate",
"intent_string": "what are the operating times of the bank branch? ",
"custom_template": "Given a chat conversation and a new user question, determine if the new user question is a continuation of the given chat conversation. Return 'True' if the new user question is a continuation, indicating it directly relates to or follows up on the conversation's topic. Return 'False' if the new user question introduces a new topic not directly related to the chat conversation. Examples:1. Chat Conversation: 'Human: How do I reset my password? AI: You can reset your password by going to the settings page, selecting 'Account Management', and then 'Reset Password'. Make sure to have your current password or access to your email to complete the process. Do you need help with anything else?' New User Question: 'Can you guide me through the process?' Answer: True2. Chat Conversation: 'Human: what is the procedure for sick leave in Iterate? AI: The procedure for sick leave at Iterate, as stated in the Employee Handbook, requires all California and Colorado employees to notify their supervisor and Human Resources via email when using time off for sick leave. This is to comply with State laws regarding sick leave tracking. It's also important to communicate with your manager and team members in advance when scheduling an absence and notify the appropriate manager before the start of the workday when an unscheduled absence occurs. Management may request verification of absences, such as a doctor's note, when it's legal and appropriate to do so. Do you need information on any other policies?' New User Question: 'What is the remuneration policy in Iterate?' Answer: FalseDetermine if the new user question is a continuation of the chat conversation and return the answer 'True' or 'False' in this format Intent: [Answer] ",
"instructions": "New user question is:\nLast chat conversation is:",
"intent_type": "text"
}
- Type 2, Approach 1: JSON input with Default template and Instructions.
This is how you can provide the input of Intent analyser node (example):
"llm_intent_analyzer": {
"intents": {
"open_account": "I want to open a new account with this bank",
"close_account": "I want to close my account",
"check_balance": "Please check my balance in my account or I want to check my balance",
"bank_hours": "Until what time are you open today?"
},
"intent_string": "what are the operating times of the bank branch? ",
"custom_template": "",
"instructions": "",
"intent_type": "json"
}
- Type 2, Approach 2: JSON input with custom template and instructions.
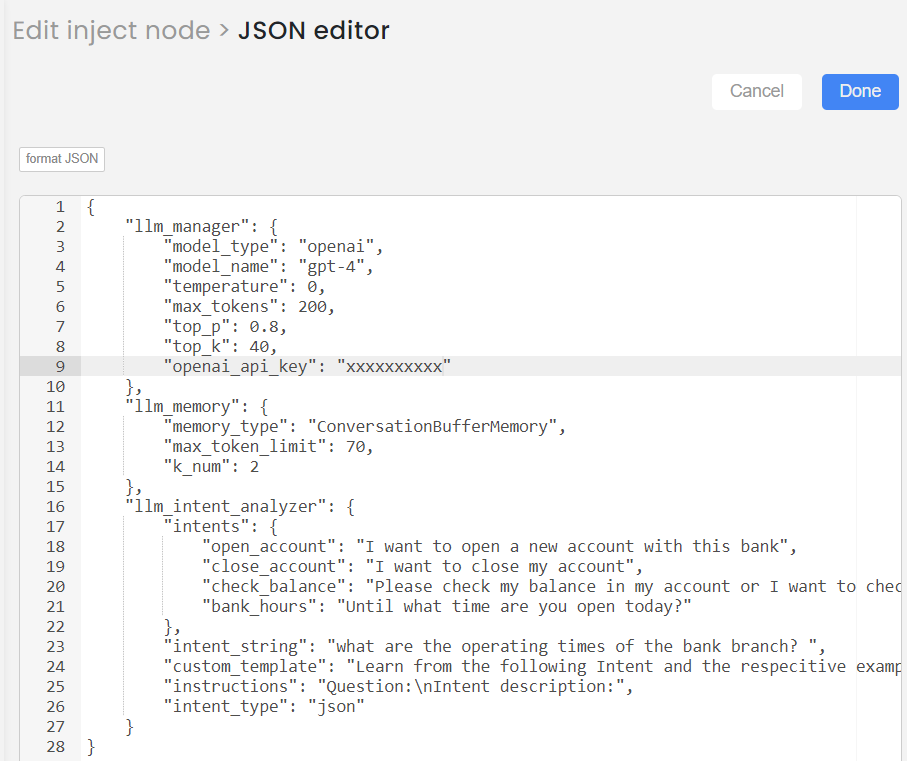
This is how you can provide the input of Intent analyser node (example):
"llm_intent_analyzer": {
"intents": {
"open_account": "I want to open a new account with this bank",
"close_account": "I want to close my account",
"check_balance": "Please check my balance in my account or I want to check my balance",
"bank_hours": "Until what time are you open today?"
},
"intent_string": "what are the operating times of the bank branch? ",
"custom_template": "Learn from the following Intent and the respecitive example action. Categorize the given question to which intent it belongs. Return the answer as Intent: [Answer] if you don't the know answer please return Unknown.",
"instructions": "Question:\nIntent description:",
"intent_type": "json"
}
- Step-04
Deploy and then trigger the 1st inject node. You will get the response.
- Step-05
If you want to continue the analysis, double click on the 2nd Inject node, change the statement or intent, save it, deploy the flow, and then trigger the second inject node to get the next response.
Likewise you can continue without loading the LLM each time.
5)Data Summarizer
If a user wants to summarize a paragraph or any piece of text, the Summarizer node can be used.
1. Sending inputs through the node's UI with a timestamp to trigger
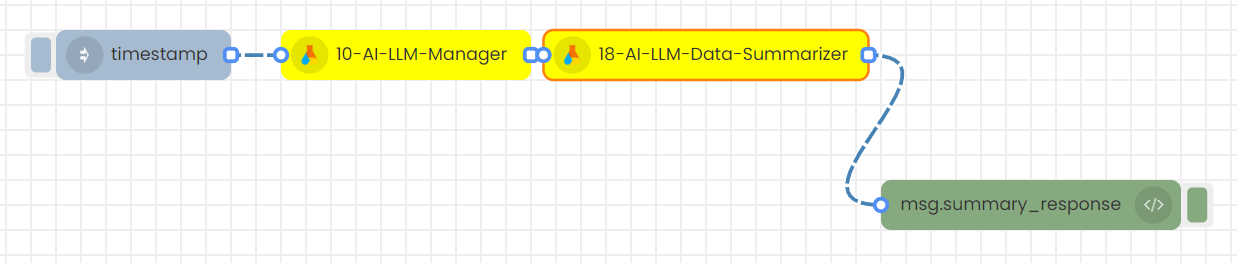
Step-01
Configure 10-AI-LLM-Manager node.
Select the Language Model (LLM): Choose between GPT-4, GPT-3.5-turbo, Turbo, GPT-3.5-turbo-1106, meta-llama/Llama-2-7b-chat-hf, or text-bison-32k through the LLM Manager node.
Then, save
Step-02
Configure 13-AI-LLM-Memory node.
Choose the Memory Type and set the desired memory type in the Memory node.
Then, save
Step-03
Configure 18-AI-LLM-Data summarizer node.
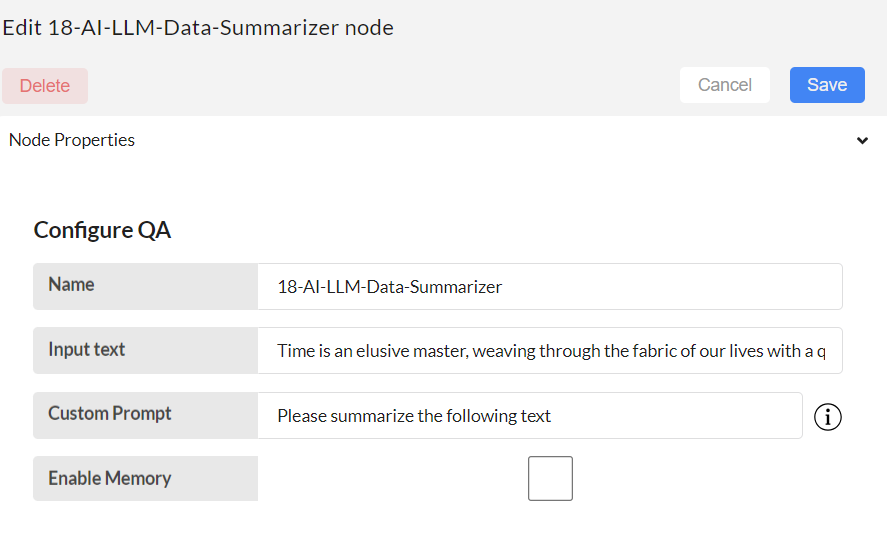
Input text:
Custom Prompt:
Enable Memory:
Then, save
Step-04
Click on deploy and trigger the flow by triggering the timestamp
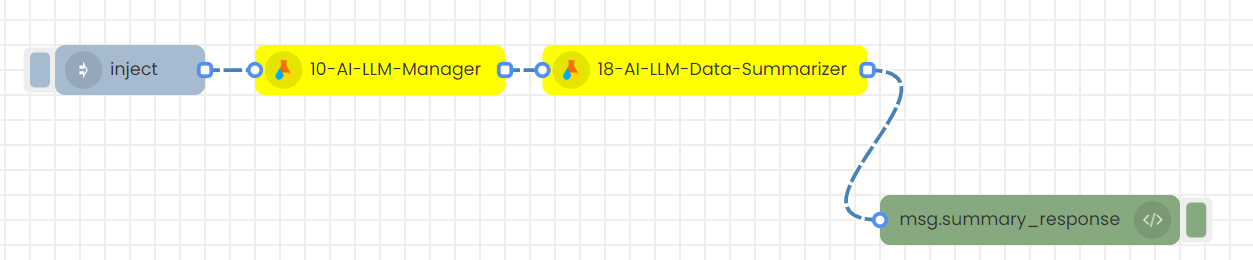
2.Sending inputs in JSON format (msg object) with an inject node to trigger
Step-01
Create this flow with inject nodes.
Step-02
Double click on the inject node.
Step-03
Add the inputs in Json format as below and Save
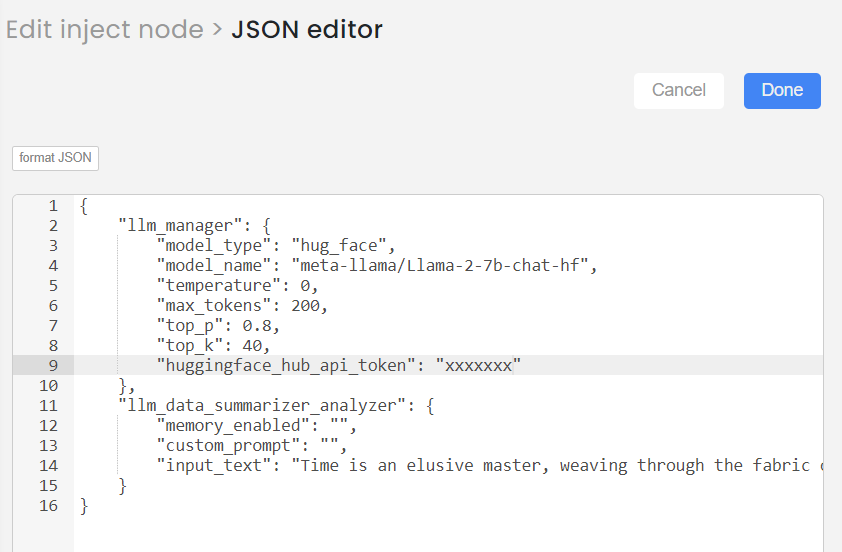
This is how you can provide the input of Intent analyser node:
"llm_data_summarizer_analyzer":{
"memory_enabled":"",
"custom_prompt":"",
"input_text":"Time is an elusive master, weaving through the fabric of our lives with a quiet persistence that is both comforting and unsettling. It's a universal rhythm that binds us all, a ceaseless march that can neither be halted nor hurried. As we traverse the landscapes of our existence, the moments that seemed so vivid and urgent slip quietly into the tapestry of memory, each one a thread in an ever-expanding work of art. We chase dreams, celebrate triumphs, and endure losses, all under the watchful eye of time, which bears witness to our transformations and stands as the silent guardian of our shared history."
}
Step-04
Deploy and then trigger the inject node. You will get the summarized text.
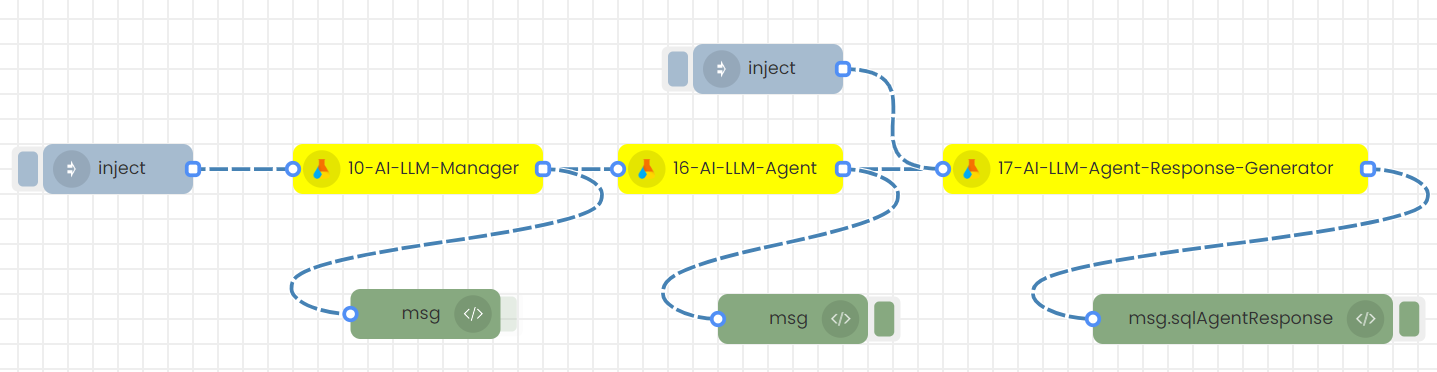
6)LLM SQL Agent flow
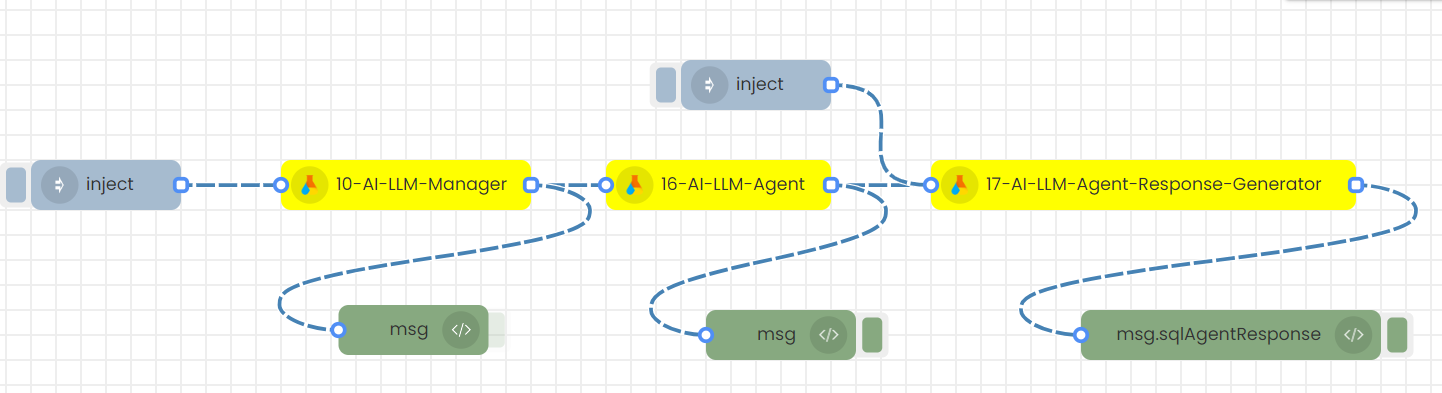
1. Sending inputs through the node's UI with a timestamp to trigger
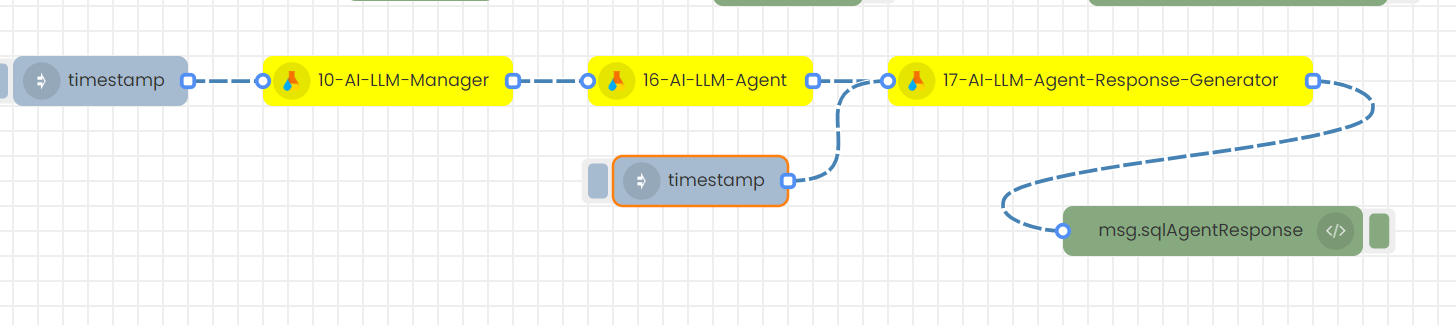
This flow is necessary when a user, who has a BigQuery database, wants to perform queries from an analytics perspective. Users can pose questions about this database and receive answers through an agent. This agent connects to the database, generates an SQL query based on the user's question, executes that query on the database, and provides a comprehensive answer to the user. The user submits their query through the Agent Response Generator node, which then returns the queried answer in a proper text format. Note that this flow is compatible only with BigQuery databases.
Step-01
Configure 10-AI-LLM-Manager node.
Select the Language Model (LLM): Choose between GPT-4, GPT-3.5-turbo, Turbo, GPT-3.5-turbo-1106, or text-bison-32k through the LLM Manager node. Only these models can work for this flow.
Then, save
Step-02
Configure 16-AI-LLM-Agent node.
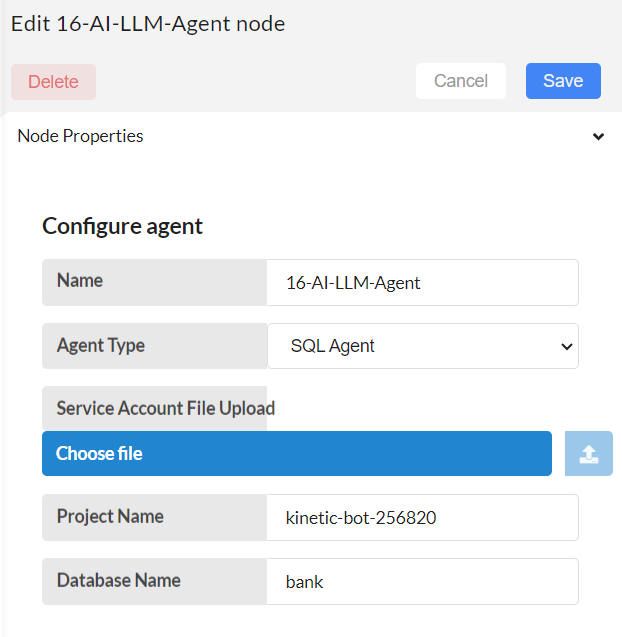
Agent type: Type of agent that will be used to interact with the BigQuery database. Here it is a langchain SQL agent.
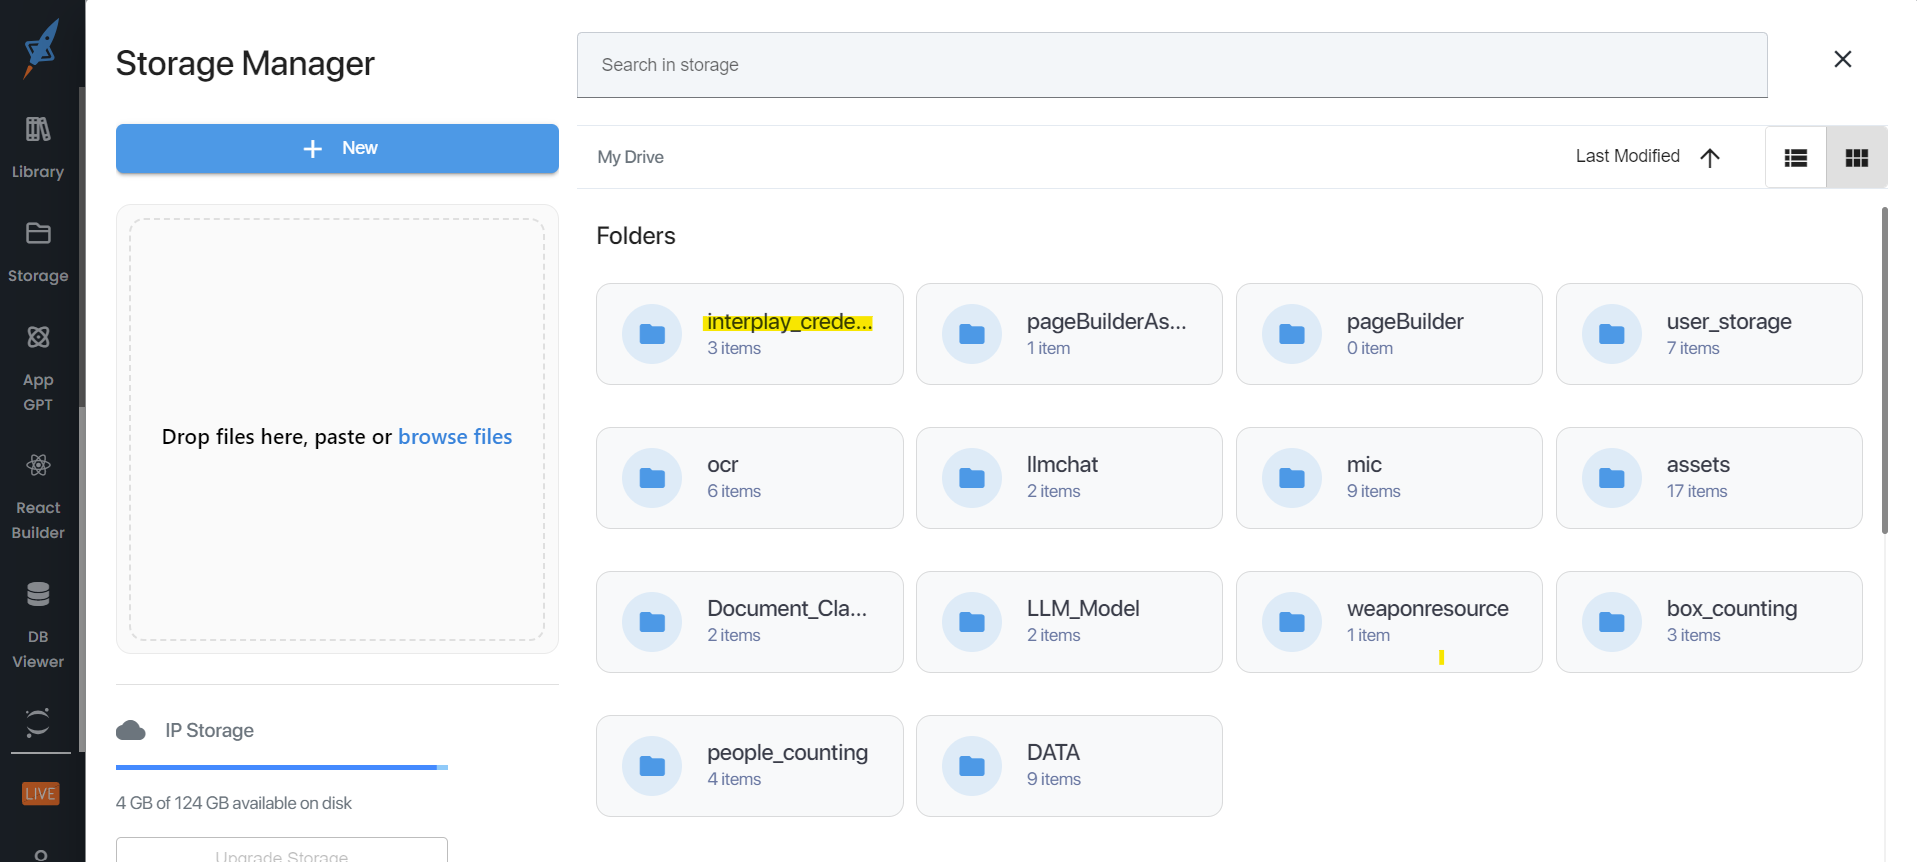
Service Account File Upload: Path of the JSON file that contains credentials and identification information for a service account in Google Cloud Platform (GCP). Create a service account in the GCP console, assign the necessary permissions, and download this file. When you upload this file here, it uses these credentials to authenticate with Google Cloud services. This file will be saved at the storage section of Interplay within directory interplay_credential_file/
Project Name: The project name refers to the GCP project where your BigQuery resources are located.
Database Name: Top level container name of the dataset in BigQuery where your tables are stored.
Then, save
Step-03
Configure 17-AI-LLM-Agent-Response-Generator node.
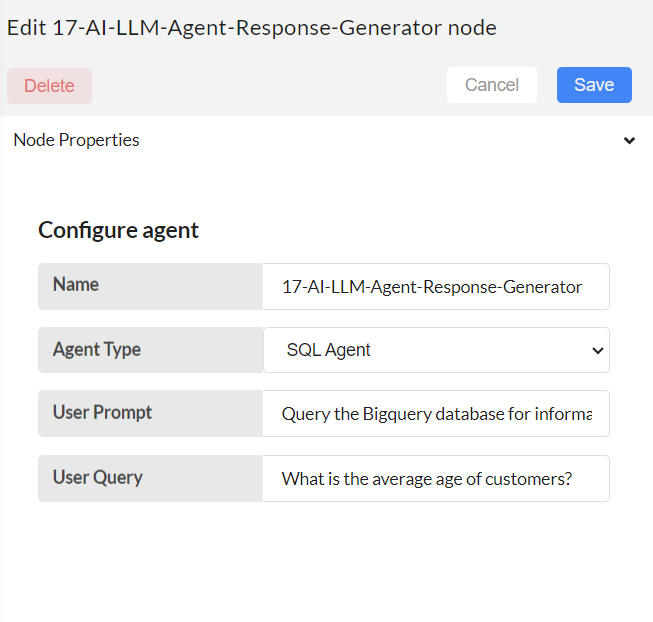
Agent Type: Choose SQL Agent
User Prompt: Provide instructions for the agent, set by default as follows: "Query the Bigquery database for information on the following user_query. Provide me the data with relevant details, insights from the Bigquery database. Pass the output in the following format: { \"response\": Actual data retrieved from the Bigquery database after executing the SQL query } Note: Ensure the 'response' field contains the results from the query execution, and not the query itself. user_query:". If you wish to make modifications, please do so; otherwise, leave this field blank to use the default settings.
User Query: Please type the question you wish to ask using the provided dataset.
Then, save
Step-04
Click on deploy and trigger the flow by triggering the timestamp
2.Sending inputs in JSON format (msg object) with an inject node to trigger
Step-01
Create this flow with inject nodes.
Step-02
Double click on the inject node.
Step-03
Add the inputs in Json format as below and Save
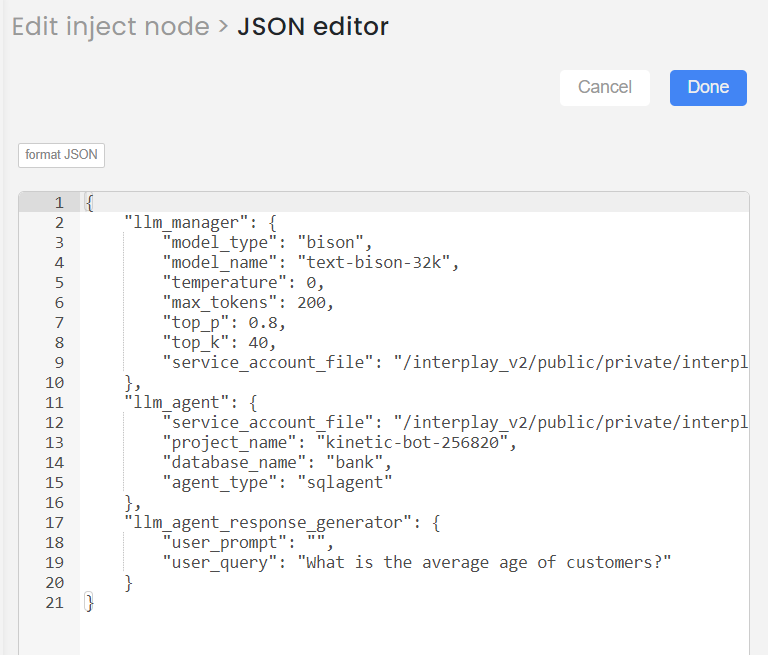
Sample Input for the Agent node is as follows:
"llm_agent": {
"service_account_file": "xxxxxxxxxx",
"project_name": "kinetic-bot-256820",
"database_name": "bank",
"agent_type": "sqlagent"
}
Sample Input for the Agent response generator node is as follows:
"llm_agent_response_generator": {
"user_prompt": "",
"user_query": "What is the average age of customers?"
}
Step-04
Save, Deploy and then trigger the 1st inject node.
Step-05
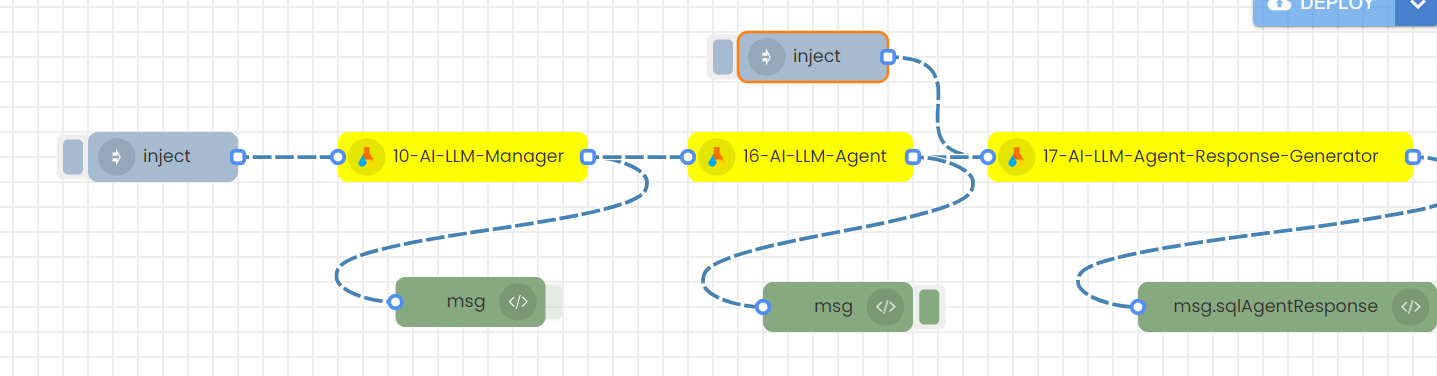
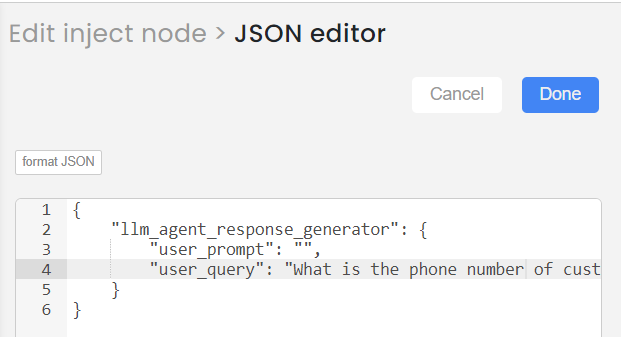
If you wish to continue asking questions, please use the second 'Inject' node. To input a new user question, double-click on the second 'Inject' node, modify the 'User question', save the node, deploy the flow, and then trigger the second 'Inject' node to receive the answer.
7)Tools

This 19-AI-LLM-Tools node facilitates connections to various LangChain tools. Currently, it integrates the Google Serper tool. Serper is a low-cost Google Search API that can be used to add answer box, knowledge graph, and organic results data from Google Search. This tool allows users to pose questions to be searched on Google, gathering current information on recent events and more. Some LLM models are not updated with current events. Therefore, we can use this node to add extra knowledge as background information.
1. Sending inputs through the node's UI with a timestamp to trigger
Step-01
Create this flow

Step-02
Configure 19-AI-LLM_Tools node
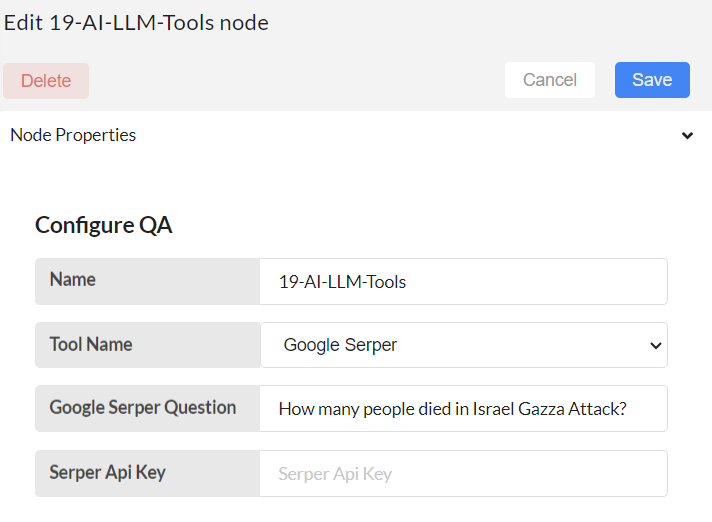
Google Serper Question: Any User question
Serper API Key: To create a Serper API key, you need to sign up for a free account on the Serper website at serper.dev. Once you have signed up, you will be able to obtain your API key. Provide the key here.
Step-03
Save and deploy the flow. Then trigger with the timestamp.
2.Sending inputs in JSON format (msg object) with an inject node to trigger
Step-01
Create this flow with inject node.

Step-02
Double click on the inject node.
Step-03
Add the inputs in Json format as below and Save
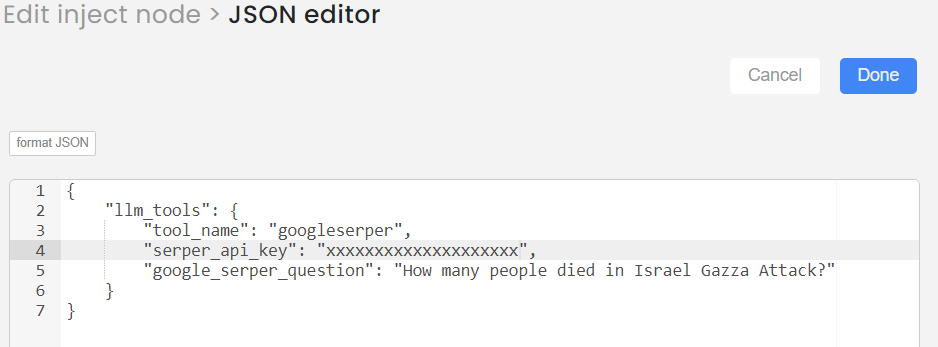
{
"llm_tools":{
"tool_name":"googleserper",
"serper_api_key":"xxxxxxxxxxx",
"google_serper_question":"How many people died in Israel Gazza Attack?"
}
}
Step-04
Deploy and then trigger the flow by clicking on inject node.
8)SFT Finetune flow
This node is used to fine-tune the LLaMA-2 model. There are two nodes involved in this task: one for fine-tuning and the other for inference. The dataset used for fine-tuning can be sourced from Hugging Face datasets. Specify the fine-tuning parameters, provide the dataset name from Hugging Face and finetune. After fine-tuning the model, use the finetuned model to answer user questions.
1. Sending inputs through the node's UI with a timestamp to trigger
Step-01
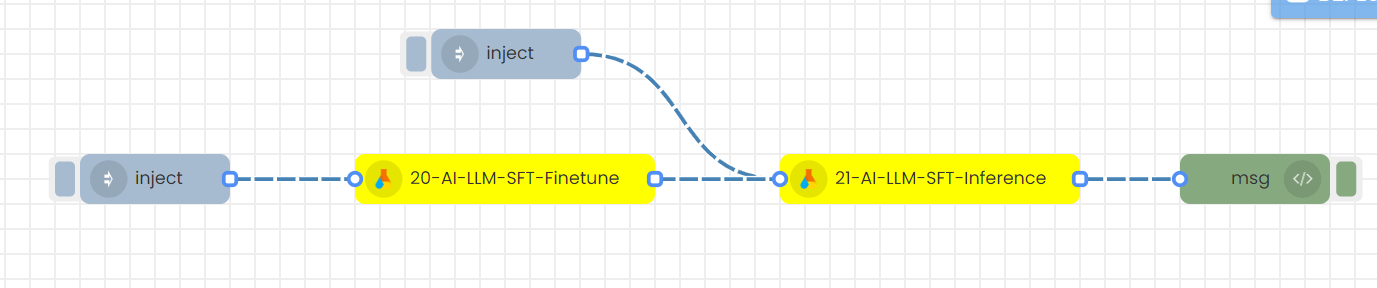
Create these 2 flows

Step-02
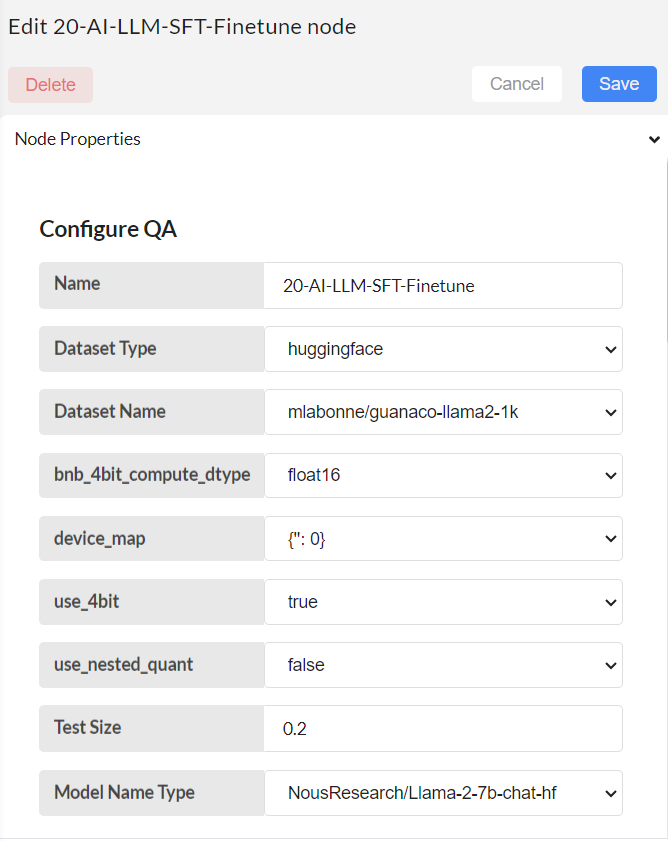
Configure 20-AI-LLM-SFT-Finetune node
Step-03

Save and deploy. Then trigger the flow with the timestamp. Finetuning is complete.
Step-04
Configure 21-AI-LLM-SFT-Inference node
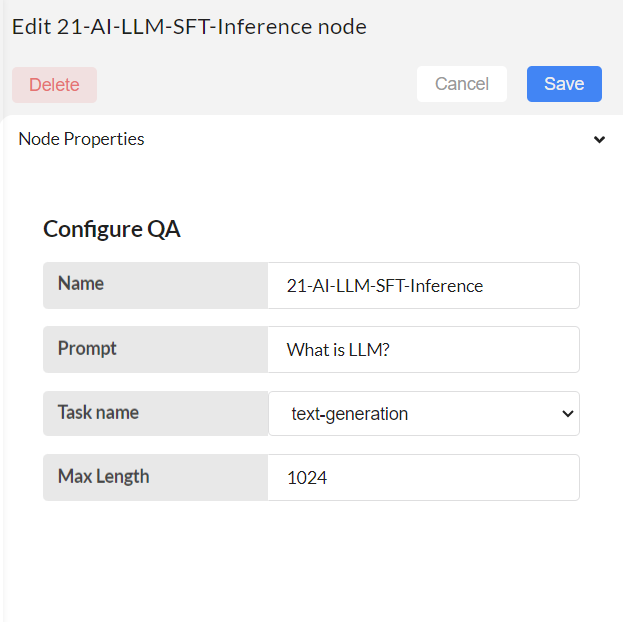
Step-05

Save and deploy. Then trigger the flow with the timestamp. Inference is complete.
2.Sending inputs in JSON format (msg object) with an inject node to trigger
Step-01
Create this flow with inject node.
Step-02
Double click on the inject node.
Step-03
Add the inputs in Json format as below and Save
The sample input is given below.
{
"llm_SFT_Finetune":{
"model_name":"NousResearch/Llama-2-7b-chat-hf",
"dataset_name":"medalpaca/medical_meadow_medqa",
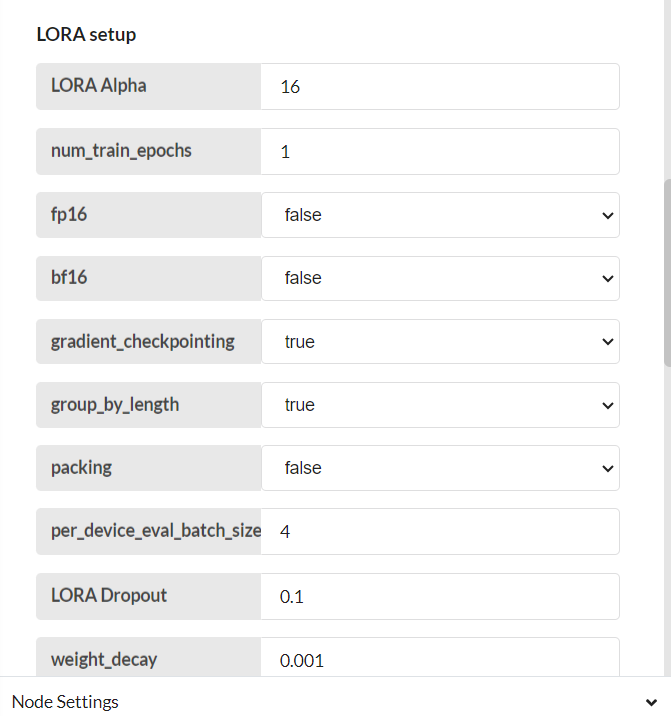
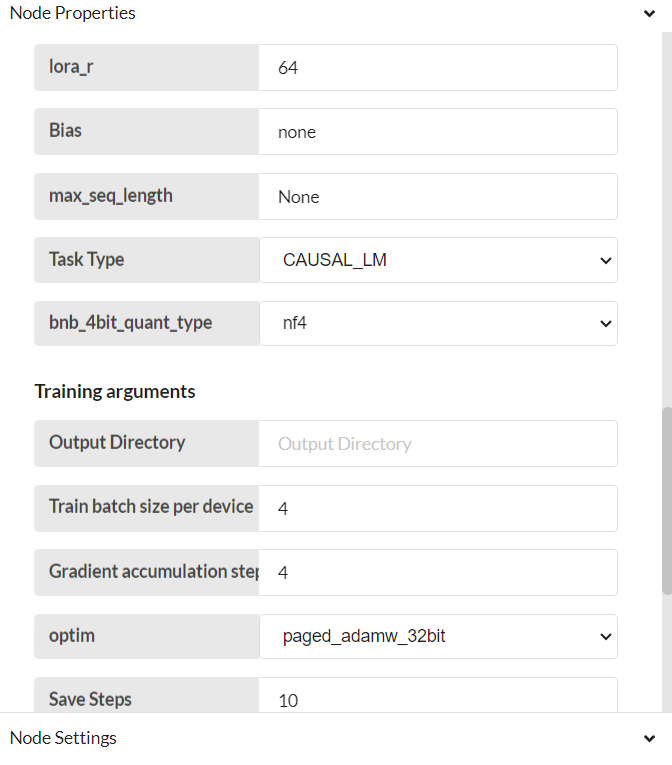
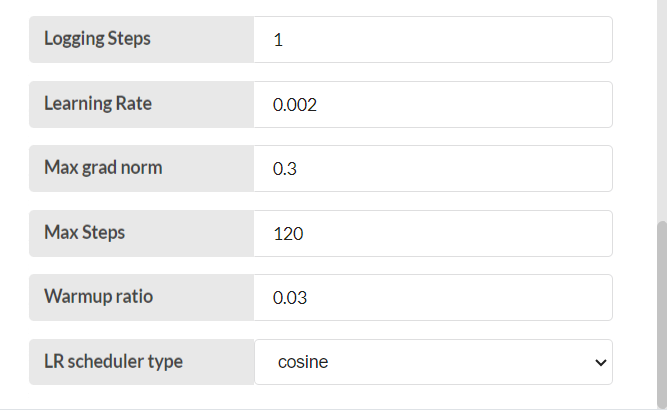
"lora_alpha":16,
"lora_dropout":0.1,
"use_4bit":"true",
"bnb_4bit_compute_dtype":"float16",
"bnb_4bit_quant_type":"nf4",
"use_nested_quant":"false",
"num_train_epochs":1,
"fp16":"false",
"bf16":"false",
"per_device_train_batch_size":4,
"per_device_eval_batch_size":4,
"gradient_accumulation_steps":4,
"gradient_checkpointing":"true",
"max_grad_norm":0.3,
"learning_rate":0.02,
"weight_decay":0.001,
"optim":"paged_adamw_32bit",
"lr_scheduler_type":"cosine",
"max_steps":1,
"warmup_ratio":0.03,
"group_by_length":"true",
"save_steps":0,
"logging_steps":25,
"max_seq_length":"true",
"packing":"false",
"device_map":"{\"\": 0}"
}
}
Model Name: Provide the name of the model from Hugging Face.
Dataset Name: Provide the name of the text dataset from Hugging Face datasets. This is the example dataset used here ( https://huggingface.co/datasets/medalpaca/medical_meadow_medqa?row=13 )
Step-04
Save, Deploy and then trigger the flow by clicking on inject node.
Step-05
Create this flow with inject node.

Step-06
Double click on the inject node. Add the inputs in Json format as below and Save
The sample input is given below.
{
"llm_SFT_Inference":{
"prompt":"The African elephant is the largest land animal on Earth. These magnificent creatures are known for their impressive tusks, large ears, and social nature. They typically live in herds led by a matriarch, roam across vast areas in search of food, and play a crucial role in their ecosystem. African elephants are primarily found in sub-Saharan Africa and are classified into two species: the African bush elephant and the African forest elephant. Unfortunately, they face threats from habitat loss and poaching.What is the largest land animal on Earth? {'A': 'African Lion', 'B': 'African Elephant', 'C': 'Giraffe', 'D': 'Rhinoceros', 'E': 'Dog'} Please answer with one of the option in the bracket.",
"max_length":1024,
"task_name":"text-generation"
}
}
Prompt: Analyze the patterns learned by the model from the given dataset, and then provide new input for the fine-tuned model to make a prediction.
Step-07

Save and deploy. Then trigger the flow with the timestamp. Inference is complete.
25-AI-LLM-Cache-Cleaning
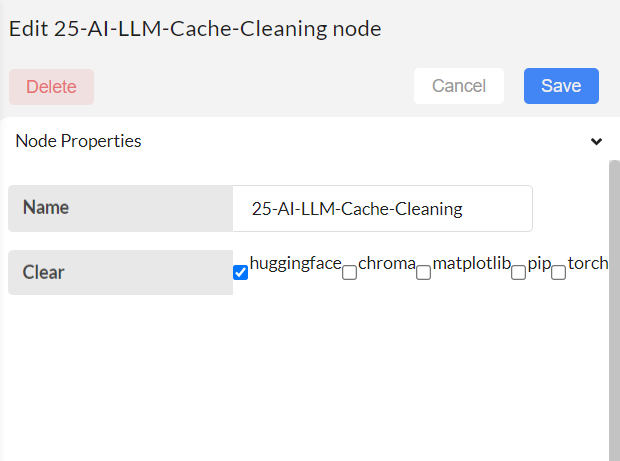
9)Cache cleaning flow
Step-01
Create this flow

Step-02
Select the directory you want to clean. Save, Deploy and trigger the timestamp.
Guide to Using the Python Function Node to Manipulate Node Responses
This part will illustrate the application of using “Python Function” node to manipulate the inputs between the nodes in Interplay. Here we are going to discuss 2 different use cases of ‘Python Function’ node. Firstly, it enables the modification of input parameter values within the msg object before transmission to subsequent nodes. Secondly, it facilitates the alteration of node responses prior to transmission to subsequent nodes in the workflow.
1. Modifying Input Parameters in the msg Object
The provided image illustrates a QA flow featuring the utilization of a 'Python Function' node for this specific purpose.
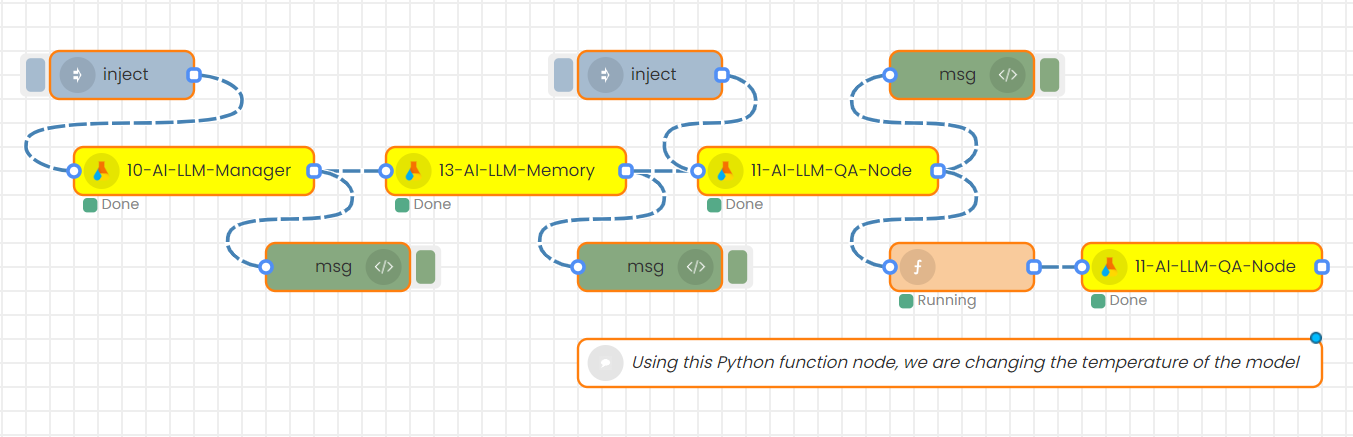
Within this QA flow, one 'Python Function' node is used. It’s positioned between two distinct QA nodes, responsible for modifying input parameter values. By double clicking over the 'Python Function' node, you can enter the segment where you can input your python code as depicted below.
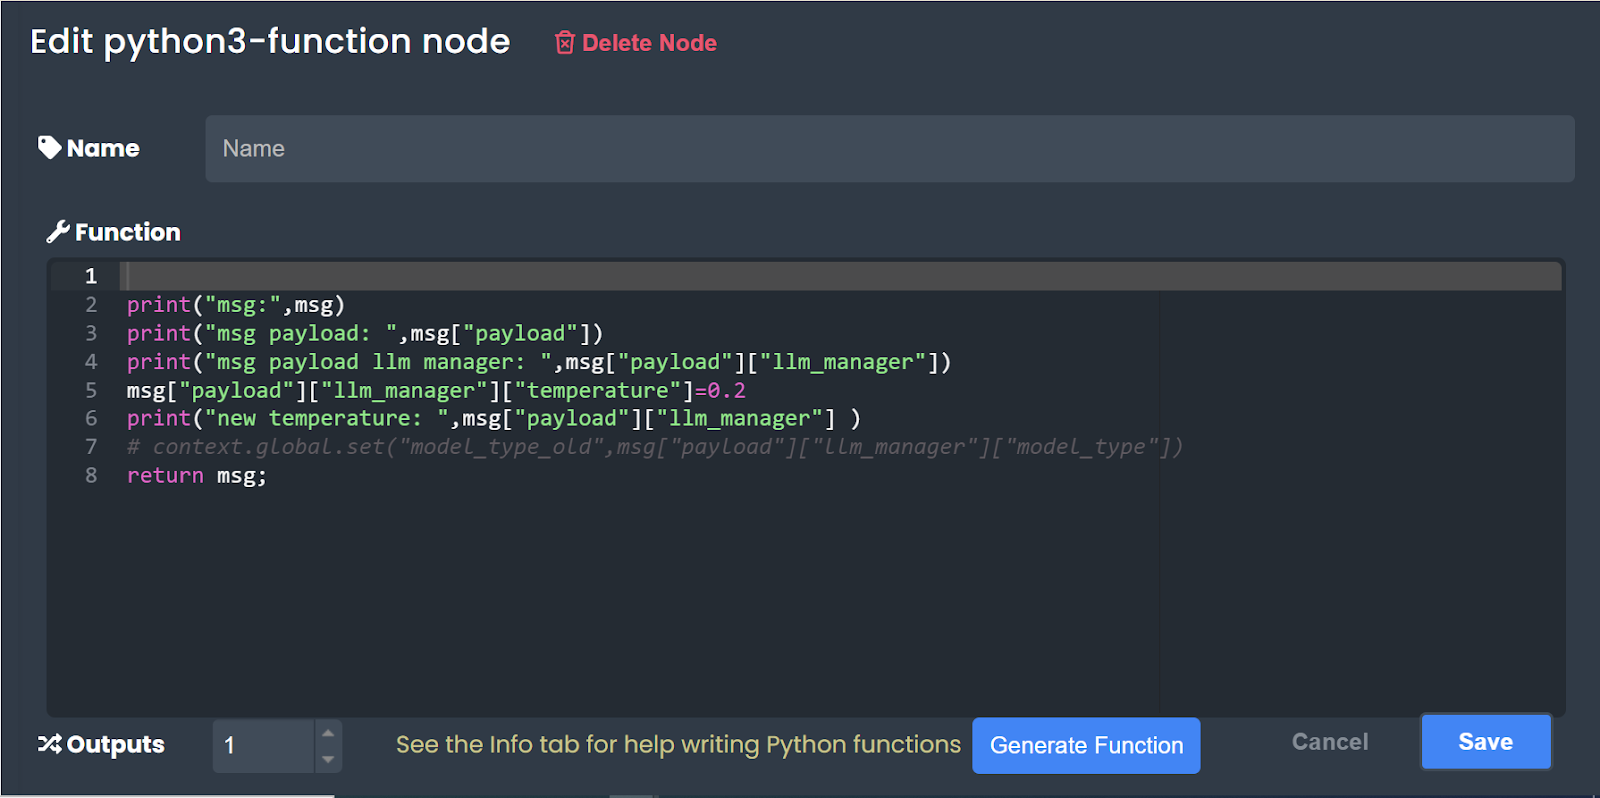
Based on the example code provided in this section, our primary objective is to adjust the value of the temperature parameter within the msg component to 0.2 from its current state. Therefore, as an initial step, we direct our attention to the 'llm_manager' within the 'payload' of the 'msg' and display its contents. By using the 'print(msg)' line, you can understand the available keys and values within the 'msg' object.
Below are the details of the input parameters prior to modification by this node:
From the printed output, the initial temperature value is recorded as 0. Subsequently, line 5 of the code adjusts this value to 0.2. Subsequent to this adjustment, the input parameter values are once again printed, yielding the following output.

In accordance with this output, the temperature parameter value is adjusted to 0.2 as intended. Likewise, the 'Python Function' node can be utilized to modify the values of any input parameters within the msg object before forwarding them to subsequent nodes.
2. Altering Node Responses for Transmission
Attached image below shows a flow where the “Python Function” node is found in between the “Data Summarizer” node and QA node. Here, “Python Function” node is used to modify the output of the “Data Summarizer” node and give that modified output as the input of the QA node.
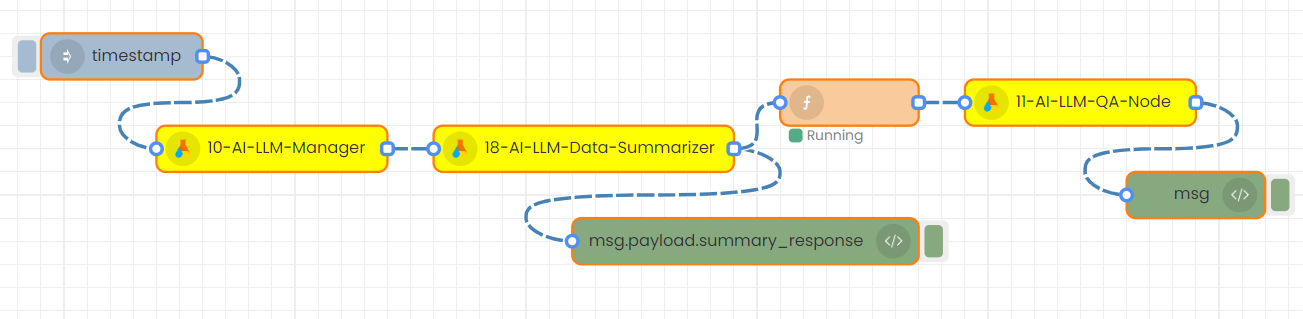
As in the previous application, by double clicking the “Python Function” node, you can enter the segment where you can insert your Python code to do the preferred task, as shown below.
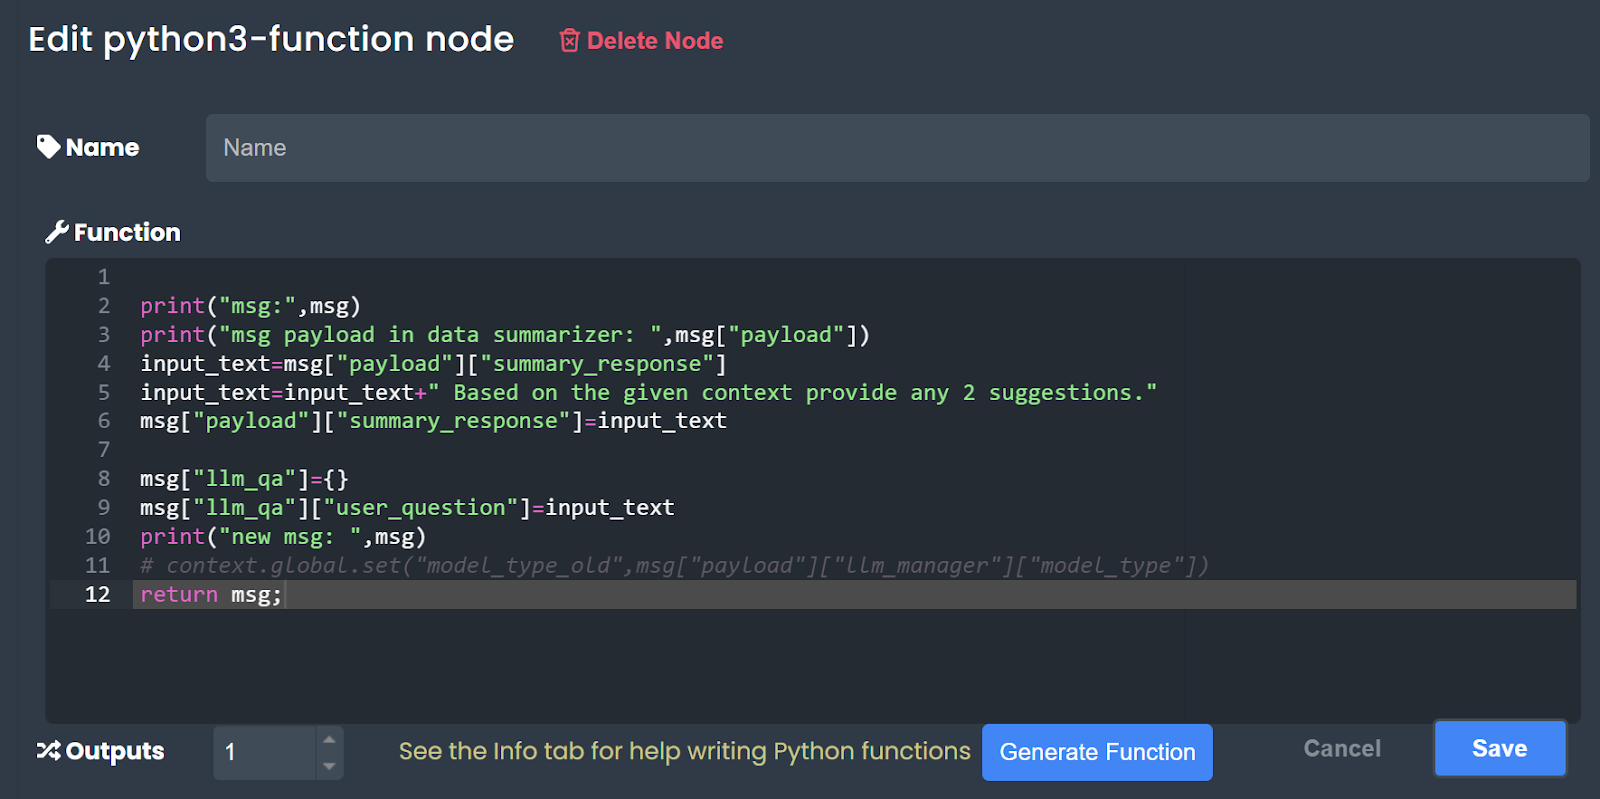
Based on the example code provided in this section, our primary objective is to add the line “Based on the given context, provide any 2 suggestions.” to the “summary_response” given by the “Data Summarizer” node and give it as the input to the QA node. Before the modification output for the “summary_response” in payload is given as follows,

After the modification by “Python Function” node the input for QA node is printed as follows,

In accordance with this output, the user question is modified with that extra line as intended. Likewise, the 'Python Function' node can be utilized to modify any outputs before forwarding them to subsequent nodes as input.
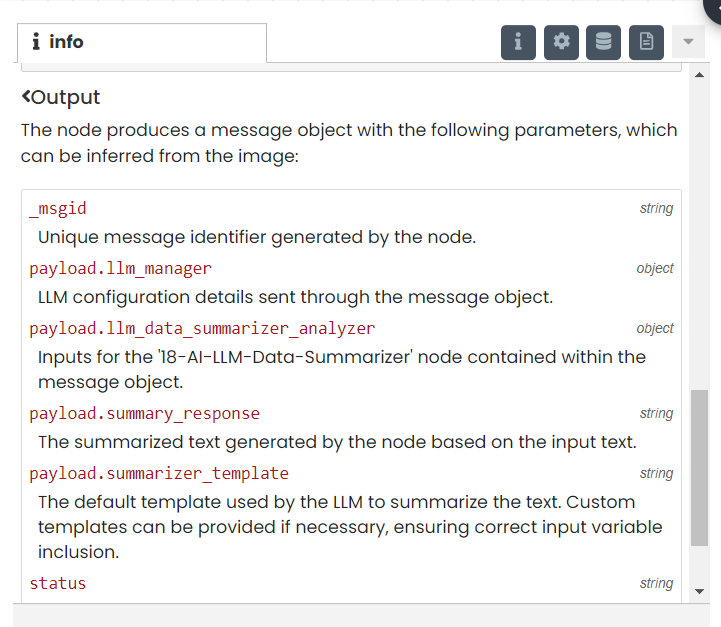
By right clicking on the node, visit the 'info section' where you can get an idea of the list of inputs given to the node and the outputs from that node.
18-AI-LLM-Data-Summarizer
11-AI-LLM-QA-Node